Expo React Native Navigation: A Practical Guide
Master Expo React Native navigation with this practical guide covering stack, tab, drawer setup, deep linking, and cross-platform best practices.
 Damini
You've built the screens, connected authentication, and tested navigation from the home screen. Then a user opens a shared link, refreshes the web app, returns from an email login, or presses Android's back button at the wrong point. Suddenly the “working” navigation setup loses the destination, shows the wrong tab, or redirects forever.
That's the working definition of Expo React Native navigation. Navigation isn't just a stack of screens or a tab bar. It's a cross-platform contract between iOS, Android, and web, with different expectations around URLs, history, cold starts, refreshes, gestures, and authentication state.
Table of Contents
- Why Navigation Is the Hard Part of Expo Apps
- Installing and Wiring Up React Navigation in an Expo Project
- Building Stacks, Tabs, and Drawers That Cooperate
- Switching to File-Based Routing with Expo Router
- Configuring Deep Links and Universal Links the Right Way
- Wiring Authentication Into Navigation Without Breaking It
- Testing Navigation Before It Ships and the Mistakes to Avoid
Why Navigation Is the Hard Part of Expo Apps
A user taps a product card, then gets dropped into the wrong tab after login. Another opens the app from a shared link, refreshes the browser, or hits Android back at the wrong moment and lands somewhere that makes no sense. Those failures are not polish problems. They are navigation problems.
React Native leaves navigation up to the app, and React Navigation grew out of the community to handle route state and screen transitions in the official React Native navigation documentation. That choice shapes everything that follows. React Navigation gives explicit control over navigator composition. Expo Router uses file-based routing, URL identity, and naming conventions that reduce manual registration. Both work in production, but they demand different decisions about route ownership, startup state, and how auth affects entry points.
The hard part is that each platform asks something different from the same route. A browser refresh rebuilds state from a URL. A native cold start has to recover from a launch intent and stored session. A screen opened from inside the app carries history; a screen opened from email or a deep link may arrive with none. Logout can also happen while a user is several levels deep in nested navigation.
 A diagram outlining the four primary navigation challenges faced when developing applications using the Expo framework.
Start with the contract
Before choosing a package, define four things:
- What is the route identity? Use a route name, a file path, or both, and keep that decision consistent.
- What happens on direct entry? Important destinations should work when opened in a browser and through a native deep link.
- What does back mean? Web back, Android back, a header button, and a modal dismissal can each point to a different action.
- What survives authentication? If a user starts at a protected screen, the app should return them there after login unless that destination no longer makes sense.
The tree should match the user journey. Onboarding, checkout, and editing usually belong in stacks. Parallel product areas fit better in tabs or drawers. A modal that sits above the main shell should be treated as its own layer, not hidden inside one tab's history.
Route ownership also becomes a team issue once several developers touch the same tree. Teams hiring for distributed product work can use remote tech team hiring advice to screen for platform-testing and auth-flow experience, which is the sort of judgment that prevents navigation from drifting across releases.
Practical rule: If a route only works after a particular sequence of taps, it is not a complete route yet.
Installing and Wiring Up React Navigation in an Expo Project
A clean Expo navigation setup starts with package installation, but the version choice matters more than the command itself. Use Expo's installer so the native packages stay aligned with the SDK instead of guessing at peer dependency versions:
npx expo install @react-navigation/native
npx expo install @react-navigation/native-stack
npx expo install react-native-screens react-native-safe-area-context
Expo's guidance for React Navigation support points to this package combination, and npx expo install helps keep the native pieces compatible with the current project state Expo's React Navigation support guide. That alignment matters most during SDK upgrades, when one mismatched native dependency can build on one platform and fail on another.
A minimal native-stack setup looks like this:
import { NavigationContainer } from '@react-navigation/native';
import { createNativeStackNavigator } from '@react-navigation/native-stack';

const Stack = createNativeStackNavigator();

export default function App() {
  return (
    <NavigationContainer>
      <Stack.Navigator>
        <Stack.Screen name="Home" component={HomeScreen} />
        <Stack.Screen name="Details" component={DetailsScreen} />
      </Stack.Navigator>
    </NavigationContainer>
  );
}
NavigationContainer owns navigation state. The stack defines the route order and the screen components. Keep those responsibilities separate. Authentication providers, theme providers, and data clients can wrap the container, but each screen should stay focused on its own job instead of trying to rebuild the tree.
 A laptop displaying terminal code commands next to a smartphone showing a mobile app interface design.
Choose the stack based on behavior
The native stack uses platform-native primitives for transitions and screen behavior. It is usually the right default for ordinary push-and-pop flows because iOS and Android already handle those patterns in familiar ways.
The JavaScript stack makes sense when you need custom transitions, animated presentation logic, or behavior that does not fit cleanly into native primitives. It gives you more direct control, and that control means more work to keep the experience consistent across platforms.
For a new Expo app, keep the first navigator boring. Add custom transitions only after you can explain which user behavior they improve. If you are setting up the rest of the project, this Expo getting started guide is a useful companion to the navigation wiring.
Building Stacks, Tabs, and Drawers That Cooperate
A stack handles ordered screens. Tabs and drawers handle parallel areas. That sounds straightforward until a navigator lands in the wrong layer and back behavior stops matching the product.
A common app shell uses a root stack, a tab navigator under it, and a detail stack inside each tab so each section keeps its own history:
const HomeStack = createNativeStackNavigator();
const RootStack = createNativeStackNavigator();
const Tabs = createBottomTabNavigator();

function HomeNavigator() {
  return (
    <HomeStack.Navigator>
      <HomeStack.Screen name="Home" component={HomeScreen} />
      <HomeStack.Screen name="ProductDetails" component={ProductDetailsScreen} />
    </HomeStack.Navigator>
  );
}

function AppTabs() {
  return (
    <Tabs.Navigator>
      <Tabs.Screen name="HomeTab" component={HomeNavigator} />
      <Tabs.Screen name="AccountTab" component={AccountScreen} />
    </Tabs.Navigator>
  );
}

function RootNavigator() {
  return (
    <RootStack.Navigator>
      <RootStack.Screen name="MainTabs" component={AppTabs} />
      <RootStack.Screen name="Modal" component={ModalScreen} />
    </RootStack.Navigator>
  );
}
The Home tab owns the move from the home screen to product details. Switching to the account tab should not wipe that history. The root stack owns the modal because the modal sits above the tab shell, not inside one parallel section.
Match navigator boundaries to user expectations
Use a stack inside a tab when each tab has its own sequence of screens. A user can open a detail page in Home, switch to Account, then come back to Home without losing product context. Exact preservation depends on configuration, but the design goal stays the same.
Use a drawer for broad sections that users open less often. A drawer with a child stack can work well, but the gesture area needs testing. Drawer swipes can conflict with child screen gestures, especially on carousels and swipe actions.
Android back behavior needs direct testing. From a detail screen, back should usually pop the child stack. At the tab root, it may move to the parent navigator or exit the app, depending on state. A modal should close before the tab history changes underneath it.
If you cannot name the product boundary a navigator represents, it probably should not exist.
Avoid adding a navigator for every screen. Each boundary should represent something users understand, such as an authenticated shell, a tab section, a checkout flow, or a modal layer. Too many layers make route ownership harder to trace and back behavior harder to predict.
Switching to File-Based Routing with Expo Router
Expo Router changes the source of truth. Instead of registering every screen in a central navigator, you create route files under src/app, and _layout files define the navigator boundaries around them.
A small structure might look like this:
src/app/
  _layout.tsx
  index.tsx
  (auth)/
    _layout.tsx
    login.tsx
  (tabs)/
    _layout.tsx
    index.tsx
    settings.tsx
  profile/
    index.tsx
Each page file should default-export a component. src/app/index.tsx resolves the / entry point. A folder such as profile creates a nested route, while (auth) and (tabs) are route groups. The parentheses organize files and navigation boundaries without adding those group names to the URL.
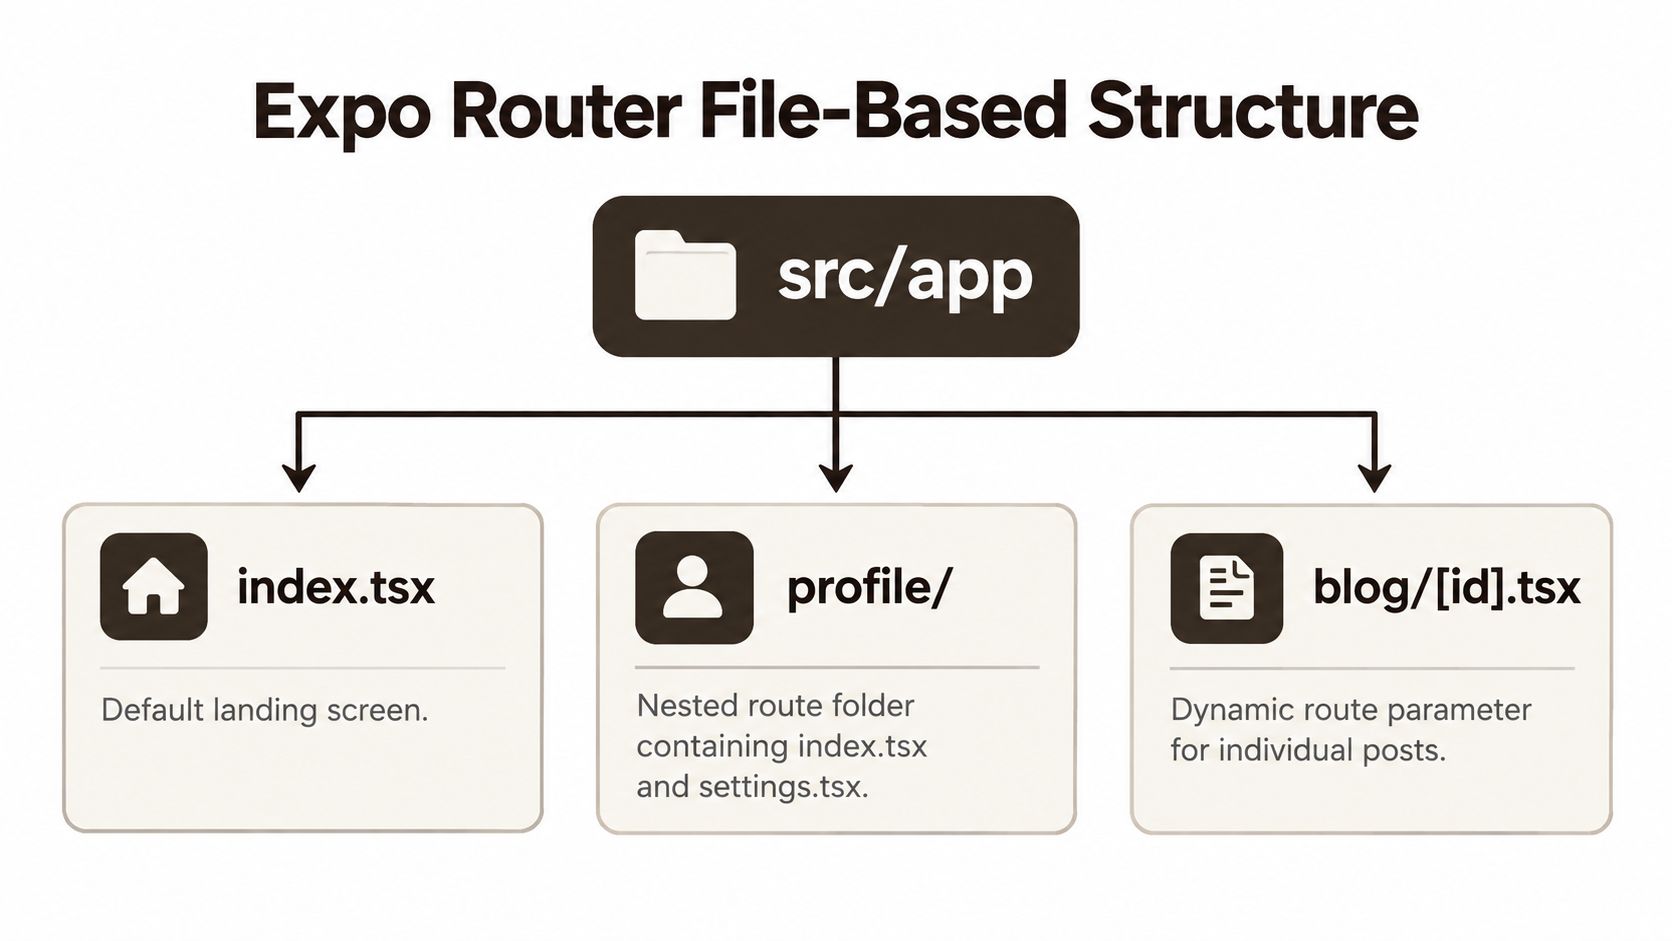 A diagram illustrating the Expo Router file-based routing structure using a directory tree layout.
Expo Router supports Android, iOS, tvOS, and web, and it's included in Expo Go. Its files and directories map to screens or URLs, while its APIs provide links, redirects, route replacement, and access to root navigation state according to the Expo navigation documentation.
Layout files are navigator boundaries
A root _layout.tsx can provide the application shell and root stack. A (tabs)/_layout.tsx can define tabs. A protected group can use its layout to coordinate access checks and redirection. This colocates navigation intent with the files that belong to the flow.
The trade-off is convention. File names, group names, dynamic segments, and layout placement now carry architectural meaning. That reduces repetitive wiring, but it means a developer can change routing behavior by moving a file. Teams need route ownership rules and review discipline.
Use Link for declarative transitions and router.push or related APIs when application logic must initiate movement. Test both. A route that works from an in-app link may still fail when opened directly through its web path or native scheme.
Teams deciding between the two approaches can compare the practical trade-offs in this guide to Expo Router versus React Navigation. The useful question isn't which API is more fashionable. It's whether your team benefits more from file-system conventions or explicit navigator configuration.
Configuring Deep Links and Universal Links the Right Way
Deep linking fails when teams treat it as a feature that turns on by itself. Expo Router can make route discovery and link handling more automatic, but a reliable production flow still needs an explicit URL strategy.
Start by mapping user journeys to stable paths. A password reset, an invitation, a product detail screen, and a settings page should each have a clear destination identity. Then define the app scheme and connect production domains through the platform's universal-link or app-link configuration. The exact platform files differ, but the design requirement is shared: the same destination must be recognizable from a native launch and a browser URL.
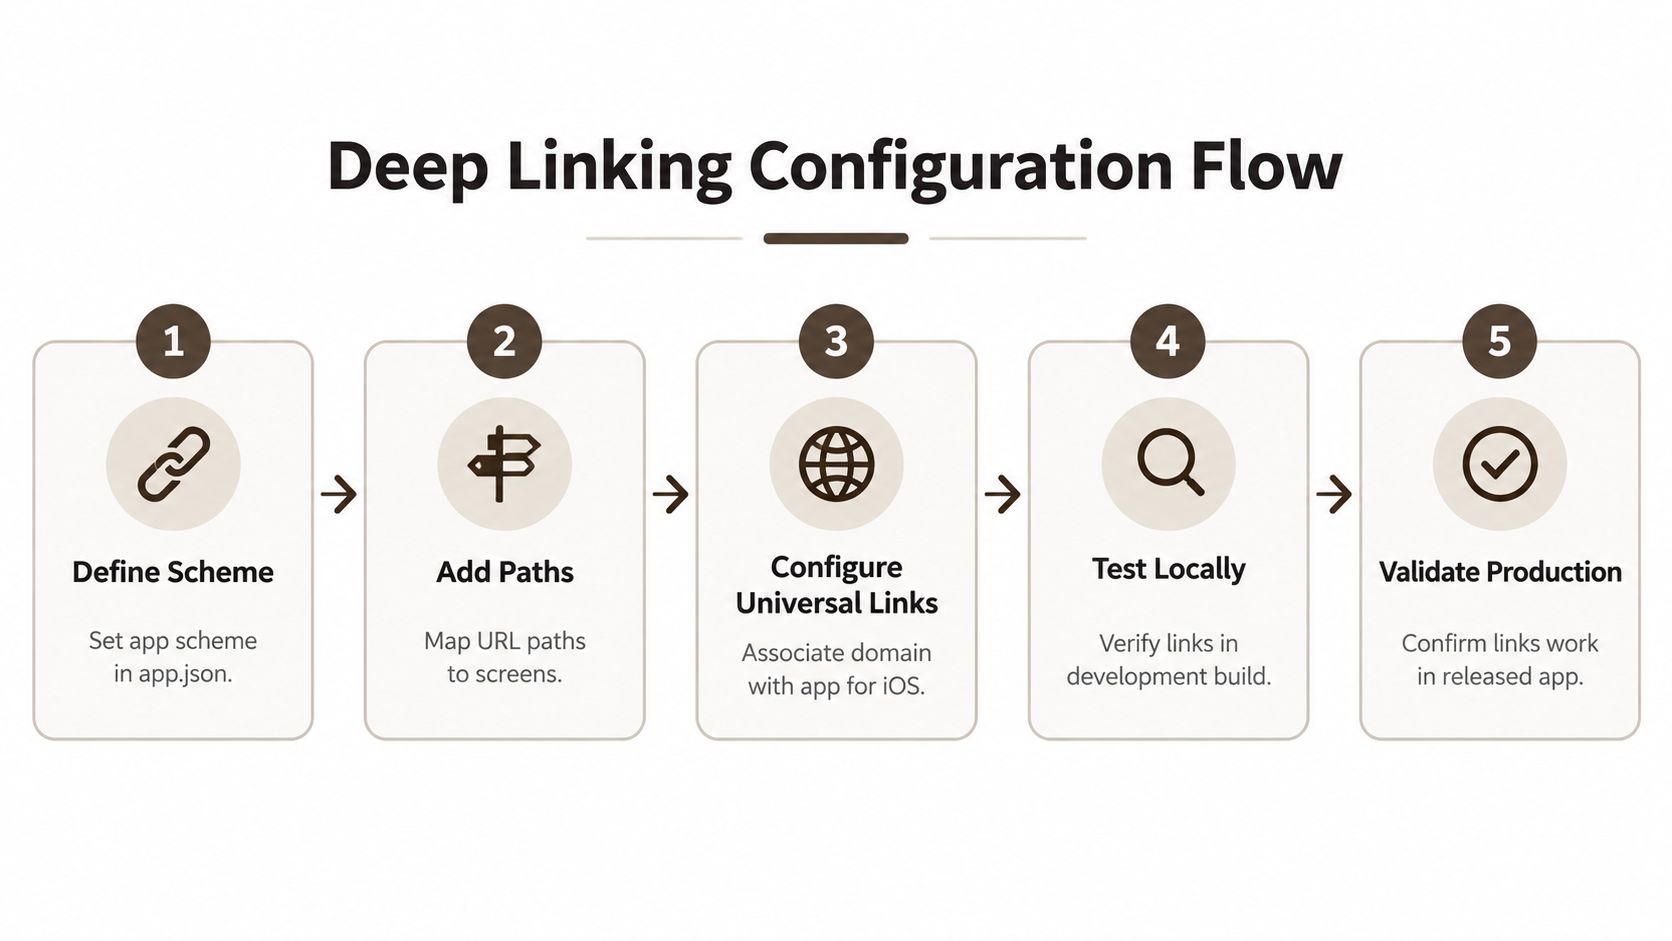 A flowchart showing the five steps of the deep linking configuration process for mobile applications.
Test entry points, not just transitions
A practical validation sequence is straightforward:
- Map journeys to URLs. Give each important flow a stable route identity.
- Create route files and layouts. Keep stack and tab boundaries explicit.
- Test internal transitions. Exercise
Linkandrouter.pushfrom the application. - Open routes directly. Test each path in a browser and through the configured native scheme.
- Verify history behavior. Check back behavior across nested stacks and tabs.
This sequence is documented in Expo's navigation basics. It catches the difference between “navigation works after tapping through the app” and “the route can reconstruct itself from an external entry point.”
Web refresh is the sharpest test. A user may arrive at a protected path while the session is still restoring. If the router selects a group before authentication state is ready, the app can redirect to the wrong place or render a route that doesn't match the intended shell. An anchor route gives the router a stable fallback during cold starts and access changes.
A documented 2025 Expo issue describes a concrete failure mode where identical routes in separate protected groups work during in-app navigation but fail when a web user directly enters or refreshes a URL because the router cannot determine which group should render from authentication state as recorded in the Expo issue tracker. Avoid duplicate route identities across groups. If two groups can plausibly answer the same URL, the URL is ambiguous even if the in-app transition looks correct.
For deeper implementation patterns around app-to-browser and browser-to-app flows, see this guide to deep linking in React Native.
Wiring Authentication Into Navigation Without Breaking It
Authentication should control access without destroying navigation context. The difficult case begins when a user opens a protected deep link, needs to authenticate externally, and must return to the original destination after the session is established.
Expo's authentication guidance describes protected routes as client-side logic that redirects users to an anchor route when access changes. It also makes an important distinction: routes remain defined and accessible in Expo Router, so a client-side guard is not server-side authorization as explained in Expo's authentication documentation.
Restore the session before choosing a route
At startup, restore the session from secure storage before rendering the authenticated navigation tree. Keep the splash screen visible while that asynchronous work completes, or render a deliberate loading state that cannot trigger an authentication redirect prematurely.
The state model should distinguish at least three conditions:
- Unknown: session restoration is still running.
- Signed out: no valid session is available.
- Signed in: the session is available and usable.
Redirect only after the state leaves Unknown. Otherwise, the app can send a returning user to login, then immediately send them back to the protected route when restoration finishes. That loop is especially easy to trigger during cold starts and magic-link callbacks.
Preserve and validate the return path
When a user enters through /orders/example, store that intended path in a controlled return value before sending them to authentication. After login, validate that the destination is an internal route your application recognizes. Don't blindly redirect to an arbitrary URL supplied by a query parameter.
Email and magic-link flows deserve their own tests because the user may leave the app, complete verification in a browser, and return through a callback. The callback handler should establish the session, clear one-time parameters, and redirect to the validated destination. If the link is expired or already consumed, send the user to a useful recovery screen instead of repeatedly retrying the same callback.
React Navigation generally requires more manual deep-link configuration, while Expo Router derives more of the route relationship from its file structure. Neither approach removes the need for API authorization. A user can bypass a client-side screen guard, so every protected resource must still be authorized by the backend.
Security boundary: Navigation decides what the client displays. The API decides what the user may access.
Logout needs the same care as login. Clear sensitive session state, move the user to the signed-out anchor route, and prevent stale screens from remaining reachable through back navigation. The exact reset operation differs between React Navigation and Expo Router, but the invariant is the same. A signed-out user shouldn't be able to revisit authenticated content from an old navigation history.
Testing Navigation Before It Ships and the Mistakes to Avoid
“Expo Router handles everything” is a useful starting assumption, not a release criterion. Navigation bugs often preserve a functioning UI while sending users to the wrong place.
Build a route-identity matrix with each important path, its expected screen, authentication requirement, and behavior on iOS, Android, and web. Then test direct browser entry, browser refresh, browser back and forward, native cold starts, external callbacks, logout from a nested screen, and Android back through every navigator boundary.
Use a failure-oriented checklist:
- Duplicate paths: Make sure separate route groups cannot claim the same URL.
- Missing anchors: Define a stable fallback for cold starts and access changes.
- Premature redirects: Don't evaluate protected routes while session state is still unknown.
- False security: Treat client guards as presentation logic, not authorization.
- Rebuilt history assumptions: A deep link may reach the correct screen without reconstructing the same tab history as an in-app transition.
- Platform drift: Test the same route identity through a browser URL, native scheme, and physical-device launch.
The central trade-off is clear. File-based routing reduces manual setup, but it increases the importance of URL identity, group boundaries, and platform-specific tests. React Navigation exposes more configuration, but that explicitness can make unusual state transitions easier to model. Choose the system your team can test under failure, not merely the one that produces the fastest demo.
AppLighter provides an Expo and React Native starter foundation with navigation, authentication, state management, and backend integration already wired into the project structure. If you want to begin with a production-oriented routing setup instead of assembling each layer from scratch, visit AppLighter and evaluate how it fits your cross-platform navigation workflow.