Expo App Distribution: The Complete Release Guide
Master expo app distribution with the three-lane release model. Learn EAS builds, OTA updates, and store submissions for faster React Native launches.
 Suraj
Suraj
Expo app distribution works best as a three-lane workflow: web for instant validation, internal builds for controlled testing, and app stores for public release. The same Expo codebase can move between lanes without forcing every audience through the slowest path.
Table of Contents
- Understanding the Three-Lane Model
- Expo Distribution Channels Overview
- Web Channel: Get Something Shareable Fast
- Internal Channel: Controlled Rehearsal
- Store Channel: The Polished Release
- Publish a Shareable Preview
- Keep Mobile in Reach
- Choose Consistent Build Profiles
- Protect Signing and Release Access
- Connect Starter Kits to Expo Builds
- Ship Faster Without Losing Control
- Match the Build to the Test
- Organize Access Before Sharing
Understanding the Three-Lane Model
Picture your project as a river that splits into three channels. Each one carries the same product toward a different destination, with its own format, audience, and level of control.
This diagram shows how Expo Distribution connects web deployment, internal testing, and public store release.
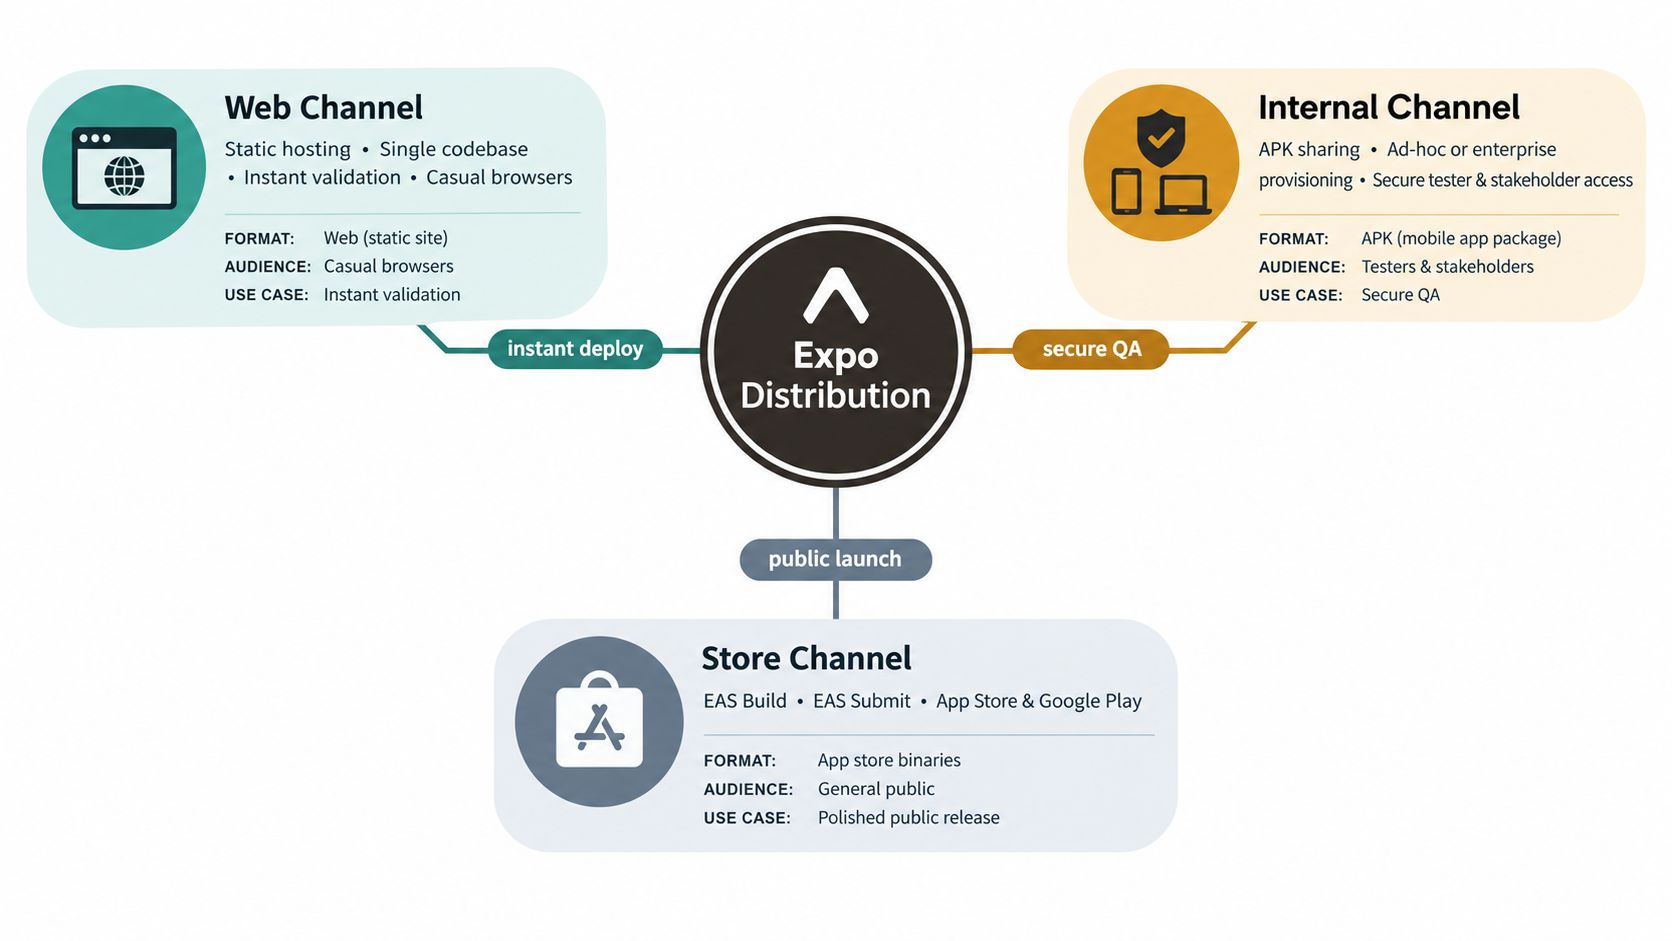 A diagram illustrating Expo distribution channels including web, internal, and app store release methods for software.
The key insight: these lanes complement each other. You can validate a feature on the web, give a preview build to testers, and submit the finished binary to Apple and Google from one release process.
Expo Distribution Channels Overview
Here's a quick comparison of the three primary distribution lanes available in the modern Expo ecosystem.
| Distribution Lane | File Format | Target Audience | Primary Use Case |
|---|---|---|---|
| Web channel | Static web export | Browsers, early users, investors | Fast validation and demos |
| Internal channel | APK, development build, or provisioned iOS app | Testers, clients, stakeholders | Private QA and feedback |
| Store channel | Android App Bundle or iOS archive | Public customers | Production launch |
Each lane serves a distinct purpose, and understanding when to use them keeps your release cycle sane.
Web Channel: Get Something Shareable Fast
The web channel is the quickest route from idea to something people can actually open. Exporting an Expo project for the web creates deployable files for static hosting, giving you a shareable URL before mobile signing or store review even enters the picture.
This lane is perfect for showing an investor a demo, getting early feedback from non-technical stakeholders, or proving that a concept works before you invest in the heavier build pipeline.
Internal Channel: Controlled Rehearsal
The internal channel is your dress rehearsal. Android testers might receive a straightforward APK, while iOS testing typically goes through TestFlight or Apple provisioning workflows. Use this lane when you need to verify native modules, test permissions, confirm push notifications fire correctly, or catch device-specific quirks.
Use web distribution to learn quickly, internal builds to reduce risk, and store submission to reach customers.
Skipping internal testing and jumping straight to the store is tempting right up until a critical bug reaches thousands of users. Don't skip it.
Store Channel: The Polished Release
The store channel is where things get real. EAS Build generates platform-specific binaries, and EAS Submit pushes them toward App Store Connect or Google Play Console. Store builds demand production credentials, correct versioning, and careful review preparation.
They should always follow successful internal testing, not replace it.
Build profiles let you separate development, preview, and production variants. As Bitglow's guide to Expo app flavors explains, profiles can also assign different identifiers, backends, features, or branding at build time. This keeps preview installations isolated from production data, which matters more than most teams realize until it's too late.
For a practical starting point, AppLighter provides Expo app foundations with authentication, navigation, state management, and AI tooling already connected. This lets you focus on choosing the right distribution lane instead of rebuilding release plumbing from scratch. A sensible sequence: publish a web preview first, create a clearly labeled internal build next, and submit to stores only after real devices confirm the production path.
Before committing to mobile store review cycles, use Expo web export to put your idea in front of real people. A browser build can become a live demo in hours, giving early users, investors, and teammates something they can open without installing a binary.
 A man holding a laptop stands by a river split into three channels under a clear sky.
Think of the web as the fast-moving channel of Expo app distribution. It does not replace iOS or Android release work. Instead, it lets you test the product idea while signing, device permissions, and store review remain on the longer path.
Publish a Shareable Preview
Export the project for web, then deploy the generated static files to a host like Netlify or Vercel. The result is a URL you can send in a message, drop into a pitch deck, or open during a customer interview.
A practical validation loop looks like this:
- Build one focused feature, such as onboarding or search.
- Export and publish the web version.
- Ask users to complete a specific task.
- Record friction, questions, and drop-off points.
- Improve the shared codebase and repeat.
This approach is especially useful for MVPs and indie developers. You can learn whether the core workflow makes sense before spending time preparing production credentials, native assets, or store metadata.
A web preview is not a backup plan. It is an early distribution lane that shortens the feedback loop.
Keep Mobile in Reach
Expo's universal approach allows web and native targets to grow from the same project. Shared screens, navigation, validation, and business logic can continue serving browsers while you prepare development or preview builds for physical devices.
But test native-only behavior separately. Camera access, push notifications, Bluetooth, background tasks, and some payment flows may behave differently or require a development build. The web lane validates product experience, not every device capability.
For example, an appointment app can validate account creation, provider discovery, and booking flow online first. Once users understand the workflow, an internal Android or iOS build can verify notifications and calendar permissions.
Keep web-specific assumptions isolated, document unsupported features, and avoid promising that browser behavior guarantees native behavior. That separation keeps fast experimentation from creating false confidence.
When the concept earns stronger evidence, move the same project into EAS Build profiles for internal and store releases. You keep your route to native binaries while early iteration stays quick.
For a ready-made foundation, AppLighter includes Expo authentication, navigation, state management, and web support, so you can reach a useful preview without assembling every release component yourself. Publish the smallest useful experience, invite specific testers, and let their behavior decide which mobile features deserve the next build.
 A man sitting at a wooden desk working on a laptop computer with a plant nearby.
Once your project graduates from "it works on my machine" territory, local builds start causing more problems than they solve. One developer might have a slightly different SDK version, another's signing certificate expired last Tuesday, and nobody can quite reproduce the native module issue that keeps popping up. EAS Build solves this by turning your build process into a shared factory, churning out Android and iOS binaries on managed cloud machines through consistent build profiles. If you're wondering what this'll cost, this guide to estimating EAS Build costs breaks it down.
The other half of the equation is EAS Submit. Once a build finishes, it takes that Android App Bundle or iOS archive and pushes it straight to Google Play Console or App Store Connect. No more dragging files around manually or re-entering the same metadata for the fifteenth time.
Choose Consistent Build Profiles
Build profiles keep your development, preview, and production needs from stepping on each other. A development profile spins up a build for debugging on physical devices. Preview gives you an installable APK for stakeholders to test. Production produces signed, store-ready artifacts with the right identifiers and credentials.
This separation stops a surprisingly common disaster: pushing debug configuration into production or accidentally letting testers touch live customer data. Expo's build documentation walks through exactly how managed builds and profiles fit together.
Think of each build profile as its own shipping lane, not just a grab bag of config settings.
In practice, most production setups include:
- Development, for fast iteration on devices and native module work.
- Preview, for stakeholder review and acceptance testing before anything goes live.
- Production, for signed releases and controlled over-the-air updates.
Protect Signing and Release Access
Your signing credentials are essentially the identity documents for your app. Keep them in EAS-managed credentials or a locked-down team vault, and make sure only certain people can trigger production submissions. Certificates, passwords, and API tokens have no business sitting in source control.
Before you hit submit, double-check everything: application identifier, version number, icons, permissions, environment variables. A build can pass every technical check and still point at the wrong backend or ship with half-finished store metadata.
For teams running automated delivery, commit your config files, treat profile changes as pull-request-worthy events, and gate production jobs behind approval. This gives you an audit trail and makes failed releases far less of a mystery.
The payoff is a distribution process that actually scales with your user base. Instead of chasing down what was installed on a developer's laptop six months ago, your team produces known artifacts, tests them, submits them, and follows that same reliable path every single release.
A starter kit fundamentally changes how you approach the first mile of distributing an Expo app. Rather than starting from scratch with blank screens and wiring up authentication, navigation, and state management, you're working with connected, functioning pieces from day one. AppLighter is built on Expo React Native, uses Vibecode DB with a Supabase adapter, and includes a Hono TypeScript API layer. This means your release effort goes toward product decisions instead of reinventing the same setup for every project.
That distinction matters more than it might seem. Every manually configured foundation becomes another spot where environments drift apart. A preconfigured project keeps shared logic consolidated in one codebase while build profiles handle the differences between development, preview, and production behavior. This guide on app flavors with Expo and EAS walks through how profiles and app.config.ts can assign different bundle identifiers, display names, and backend endpoints without duplicating your app.
The best distribution pipeline is almost always the one with fewer separate paths to maintain.
Connect Starter Kits to Expo Builds
Think of it like a restaurant that preps ingredients before service. Each order still gets checked and finished, but the kitchen isn't chopping vegetables from a cold start. A starter kit does the same thing: authentication flows, navigation structure, API integration, and AI-assisted development tooling are ready to go, while your EAS profiles decide which build variant reaches which audience.
A typical setup looks like this:
- Development builds for running the development client and testing native features locally.
- Preview builds for installable binaries that stakeholders and testers can review on real devices.
- Production builds for signed binaries headed to the App Store or Play Store.
AI tools can move fast on screen generation, refactoring, and writing tests, but they work best when they're constrained within these established boundaries. Let an assistant generate a new screen, then double-check the navigation route, environment variables, permissions, and how it actually behaves in the correct preview build.
This separation is a quiet lifesaver for solo developers. You can validate a web flow, spin up a preview binary, and queue a store build without designing a custom deployment approach every time you ship a feature.
Ship Faster Without Losing Control
Before you adopt a starter foundation, get clear on what belongs at build time versus runtime. App icons, bundle identifiers, splash screens, and environment-specific API endpoints typically live in configuration. User roles, feature flags, and account permissions belong in application logic instead.
For a concrete example of how this comes together, take a look at the React Native Expo starter kit from AppLighter. After that, document your build profiles, lock down your signing credentials, and make a real-device check mandatory before any production submission.
What you're building toward isn't reckless speed. It's a shorter, more predictable path from idea to tested binary, with fewer chances for a misconfiguration to slip through to your users.
Internal Testing for Expo Apps
Internal testing is the private rehearsal before your app ever reaches customers. It lets testers, clients, and investors run a working build without exposing half-finished features through a public App Store or Google Play listing.
The delivery method you pick should match what you're actually trying to verify:
- EAS Update links are great for checking JavaScript and styling changes fast.
- Android APKs let you test a complete installable binary on specific devices.
- iOS ad-hoc builds run outside the App Store on registered devices.
- TestFlight builds give you Apple's managed testing workflow.
Match the Build to the Test
Think of an OTA update like swapping pages in a book while keeping the same cover. It works well for checking screens, copy, navigation, and business logic when the native runtime hasn't changed. But it won't tell you whether a new native module, permission, app icon, or build setting actually works.
For those changes, you need a fresh binary built with the right EAS Build profile. A preview profile can spit out an Android APK you share directly, while a store-oriented profile creates an iOS build ready for TestFlight or registered-device distribution.
Use updates for fast iteration, and full binaries for native and release testing.
Keep preview variants separate from production. The Expo app flavors guidance walks through how development, preview, and production profiles can use different identifiers and backend environments, so testers never accidentally write data into your live system.
Organize Access Before Sharing
Android distribution is usually straightforward: upload or share the APK through a private channel, then give clear installation instructions. That said, never treat a forwarded file as access control. Label every build with its environment, version, commit, and expiration plan.
On iOS, ad-hoc distribution requires Apple Developer setup, registered device UDIDs, and a provisioning profile. TestFlight tends to be easier for larger groups because App Store Connect handles invitations and installation, but you still need a correctly signed build and Apple review steps for external testers.
Run through a short release checklist every time:
- Confirm tester emails and device UDIDs.
- Verify bundle identifiers and backend endpoints.
- Install on real devices, not just simulators.
- Record crashes, permissions, notifications, and upgrade behavior.
- Remove access when a project or testing cycle ends.
Keep feedback private and organized with a dedicated channel, issue board, or form. A clear naming scheme like Preview 1.4.0-build.18 makes sure everyone is talking about the same artifact. Once testers sign off, promote the tested configuration to production rather than casually rebuilding, so the binary heading toward store submission stays traceable.
Getting your Expo app into the hands of users shouldn't feel like a panic every single time. Think of it as a train pulling out of a station on a set schedule — smooth, predictable, and nothing left behind. EAS Submit handles that final handoff, bridging the gap between a finished build and the submission dashboards at App Store Connect and Google Play Console. It takes the grunt work and the upload headaches off your plate.
 A diverse team of three professionals collaborating on mobile app development during an internal testing session.
Turn Distribution Into Code
The real win comes when you wire distribution into a CI/CD pipeline. Let the machine build, test, and submit — but only after a pull request clears review. Store credentials go in protected CI secrets, eas.json stays in version control, and production jobs stay gated behind branch rules or a manual approval click.
Here's a workflow that holds up in practice:
- Install dependencies, run linting, and execute the test suite.
- Kick off a preview or production build through EAS Build.
- Test the output on a spread of representative devices.
- Push the approved binary to the stores with EAS Submit.
- Watch store processing status and release progress.
Keep development, preview, and production as distinct profiles. Build-time variants let you swap out identifiers, API endpoints, and feature flags without maintaining separate codebases. This guide to Expo app flavors walks through exactly how that works.
Automate the repetitive stuff. Keep a human in the loop only for public releases.
Versioning is your paper trail when things go sideways. Bump the app version with intention, turn on automatic build-number increments where they make sure sense, and tag the commit tied to every artifact you ship. For a broader perspective on release discipline, this release management process guide is worth your time.
Protect Updates and Rollbacks
EAS Update handles JavaScript and asset swaps that stay compatible with the already-installed native runtime. Publish to named channels, roll out to a small slice of users first, and always keep a known-good update ready to roll back to.
Anything that touches native code? That's a new binary, another round of internal testing, and another store submission — no shortcuts. Once releases are flowing reliably, this implementation guide for store badges helps turn approved builds into clean landing-page download buttons.
Starter-kit setups like AppLighter come with profiles and core integrations pre-wired, so you're not configuring from zero. The path forward becomes straightforward: validate, build, test, submit, release, monitor. Distribution stops being a scary last step and starts feeling like just another part of the job.
Do I Need an Apple Developer Account for Testing?
For iOS, the answer is almost always yes. If you want to run an ad-hoc build on a physical device, you'll need an active Apple Developer membership, registered device identifiers, and a valid provisioning profile to match. TestFlight isn't any more forgiving — it runs through App Store Connect, which also requires that paid account.
Android is a different story. Sharing an APK or testing build over email or a direct download link doesn't need a Google Play developer account upfront. You can get apps into testers' hands quickly, which makes the early testing phase much less friction.
Is EAS Update the Same as Store Submission?
These are two separate pieces of the puzzle, and mixing them up causes real confusion. EAS Update pushes new JavaScript, images, and other assets to a binary that's already installed on the device. Think of it like refreshing the content inside a house without rebuilding the house itself.
Store submission is the heavy lift. You're delivering a new signed binary through TestFlight or Google Play, which goes through review processes and version tracking.
Updates change the pages. New builds replace the book.
That's a useful rule of thumb. If your change is a screen redesign, copy tweak, or new API call handled entirely in JavaScript, an update works fine. If you're adding a native module, changing permissions, pushing a new SDK version, or updating the app configuration, you need a fresh build.
Can I Start on the Web and Add Mobile Later?
Absolutely, and this is one of the better parts of working with Expo. The web lane lets you ship to a browser and validate your flows, your UX decisions, and your API integrations before you ever touch a native build.
The key is discipline. Keep anything that requires a device camera, push notification, or native SDK isolated behind platform checks. When you're ready for mobile testing, spin up development, preview, and production profiles. One codebase, but each platform gets its own release path at the right time. No rewrite required.
Which Distribution Lane Should I Choose?
This depends on who needs the app and what stage you're at:
- Web for rapid feedback from your team or early users.
- Internal builds for device testing, stakeholder demos, and QA.
- Stores when you're ready for public customers and wide distribution.
Don't overthink it early on. Start where the feedback loop is shortest and move forward when the constraints demand it.
For teams that want to skip the scaffolding phase, AppLighter offers a ready-made Expo foundation you can pick up at applighter.com.