React Native Boilerplate A Guide to Faster App Development
Discover how a React Native boilerplate can dramatically accelerate app development. Learn to evaluate key features and build production-ready apps faster.
Think of a React Native boilerplate as a professional starter kit for building a mobile app. It’s a pre-built foundation loaded with all the essential code, configurations, and core features you’d otherwise have to build from scratch every single time. It's designed to save you from reinventing the wheel on every new project, which is a massive time-saver.
Build Apps Faster Without Starting From Scratch
Imagine you’re about to build a custom house. Would you start by forging your own hammers and smelting your own nails? Of course not. That would be completely inefficient. Yet, that's exactly what building a modern mobile app from an empty folder feels like. This is where a React Native boilerplate changes the entire game.
A good boilerplate is like getting a professionally engineered blueprint and a pre-fabricated frame delivered to your build site. The foundation is already poured, the wiring is planned out, and the plumbing is ready to connect. You get to skip all that repetitive, foundational work and jump straight into what makes the house unique—the architecture, the interior design, and all the custom touches that make it a home.
The Problem With a Blank Canvas
For any developer, staring at an empty index.js file is both exciting and a little daunting. The initial stage of any app project is filled with hundreds of decisions and repetitive tasks that have nothing to do with what makes your app special.
Before you can even think about writing code for your app's unique features, your team has to tackle a long to-do list:
- Set up the project structure: Figure out a folder system that won't become a tangled mess six months down the line.
- Configure navigation: Get a solid navigation system in place so users can move between screens.
- Implement user authentication: Build secure login, signup, and password-reset flows. This is a huge task on its own.
- Establish state management: Pick and integrate a library to manage data across the entire app.
Just getting through this initial setup can easily eat up weeks, or even months, of development time. All that time and money is spent before you've even built the first feature for your users. A quality boilerplate is designed to wipe out that friction.
How a Boilerplate Provides a Head Start
A React Native boilerplate gives you a solid, pre-configured foundation that handles all this initial heavy lifting for you. It's not just a collection of files; it's an opinionated, fully integrated system where all the essential pieces already work together smoothly.
By providing a battle-tested structure for authentication, navigation, and state management, a boilerplate eliminates thousands of hours of repetitive setup. This lets developers pour their energy into building the features that actually matter to users.
This approach does more than just speed things up. It also bakes best practices into your project from day one. Since the core architecture is designed by experts, you know your app is built on a scalable and maintainable base. You’re not just getting a bunch of code—you’re getting a proven roadmap for building a production-ready application.
Ultimately, this means you can get your idea into the App Store in a fraction of the time, letting you focus on innovation instead of infrastructure.
Why A Boilerplate Is Your Startup's Secret Weapon
For any startup or agency, the two things you never have enough of are time and money. In a world where speed is everything, a React Native boilerplate isn't just a developer tool—it's a massive strategic advantage that directly impacts your bottom line.
Think of it as a professional-grade foundation for your app. Instead of spending the first month (or more) building the essential but generic "plumbing" like user logins, screen navigation, or basic app structure, your team can jump straight into what makes your app unique. This simple shift means you can get a Minimum Viable Product (MVP) into users' hands in weeks, not an entire quarter.
Getting to market that much faster is a game-changer. You can start collecting real user feedback, iterate on your core idea, and adapt to the market far more quickly than a competitor who is still busy reinventing the wheel.
The Tangible ROI of Building on a Foundation
The most obvious win is the immediate drop in upfront development costs. When you don't have to pay developers to architect and code common features from scratch, you can cut your initial budget significantly. That's not just pocket change; it's capital you can now pour into marketing, user acquisition, or building out more advanced features.
But the benefits go way beyond the initial build. A solid boilerplate gives you a consistent, scalable architecture from day one. Everything is designed to work together seamlessly, which helps your app perform reliably across both iOS and Android. This built-in quality control helps you sidestep common architectural mistakes that often lead to expensive, time-consuming rewrites down the road.
The infographic below really puts the initial time savings into perspective.
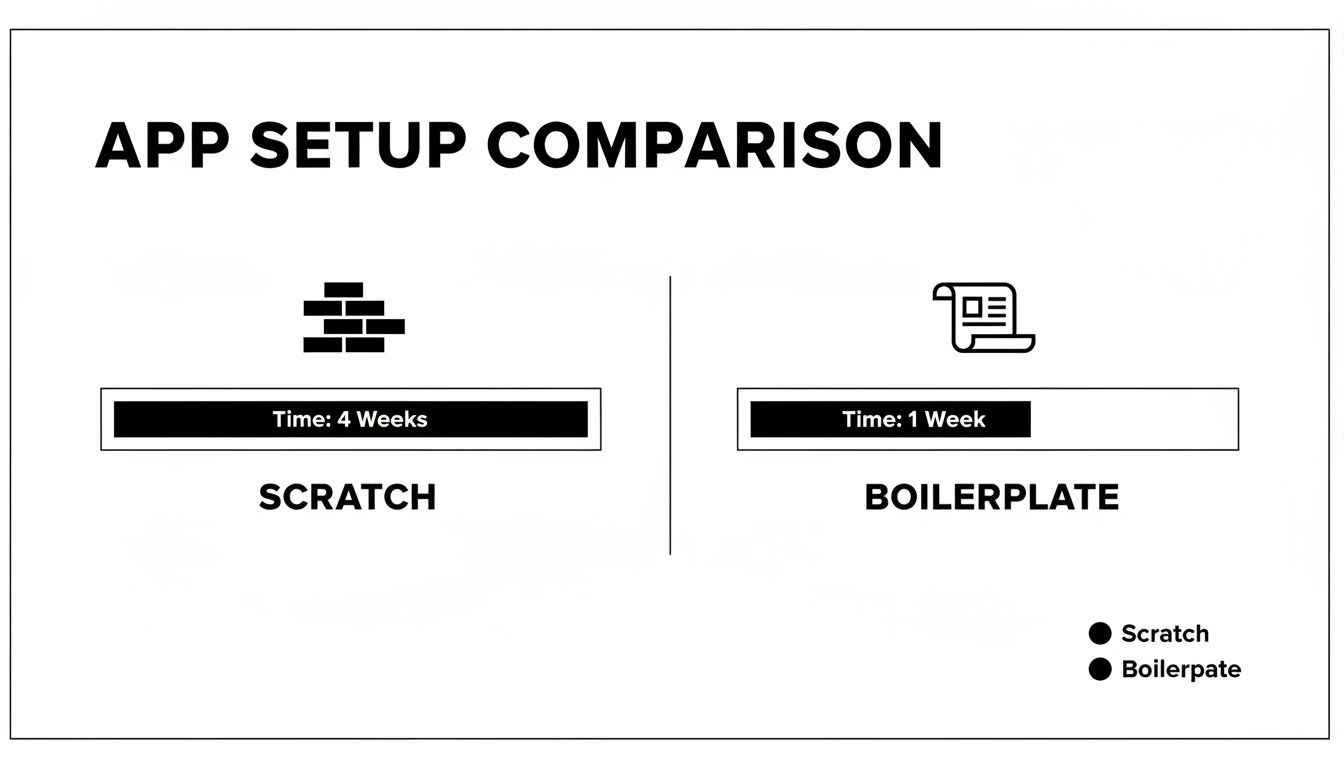 Infographic comparing app setup time: 4 weeks for scratch development vs. 1 week for boilerplate.
As you can see, what typically bogs a team down for weeks is compressed into just a few days, letting your developers get to the creative work almost immediately.
Quantifying the Time and Cost Savings
Let's put some real numbers to this. To get a feel for the true impact, we can compare the timeline and costs for building an MVP from scratch versus using a boilerplate.
The following table breaks down the typical time and cost savings for a project's foundational work.
App Development Timeline And Cost Comparison
| Development Phase | From Scratch (Estimate) | With A Boilerplate (Estimate) | Savings |
|---|---|---|---|
| Project Setup & Architecture | 4-6 Weeks | 1-2 Days | 95% |
| Authentication & User Management | 3-5 Weeks | 1 Week (Customization) | 75% |
| Navigation & Routing | 2-3 Weeks | 2-4 Days | 80% |
| State Management Integration | 1-2 Weeks | 1-2 Days | 85% |
| Total Foundational Work | 10-16 Weeks | ~2 Weeks | ~80% |
The estimates make it clear: a boilerplate can transform months of foundational work into just a couple of weeks of focused integration and customization.
This massive reduction in effort is a huge deal, especially for agencies and freelance developers. Using a complete React Native boilerplate, like the all-in-one Expo kit from AppLighter, can slash client project timelines by an incredible 60-70%. A project that used to take an entire business quarter can now be delivered in a few weeks. The best part? Development costs often drop by 40-50% while still achieving the enterprise-grade quality you see in apps from companies like Discord and Shopify. You can discover more about the cost-saving benefits of using React Native and see a deeper analysis of these figures.
A boilerplate doesn't just make you faster; it makes you smarter. By building on a foundation of best practices, you de-risk your technical roadmap and ensure your app is prepared for future growth from its very first line of code.
This strategic head start allows you to focus your limited resources on what really matters: solving a real problem for your users and building a sustainable business. It's the ultimate accelerator for turning your vision into a reality.
Anatomy Of A Production-Ready Boilerplate
Let’s be clear: not all starter kits are created equal. A basic template might hand you a tidy folder structure, but a truly production-ready React Native boilerplate is a whole different ball game. It’s a complete, integrated system where every piece is designed to work together, built for performance and scale right from the get-go.
Knowing what goes into one of these helps you spot the difference between a simple time-saver and a genuine development accelerator. It gives you a mental checklist for evaluating your options and shows you what a complete, professional solution actually looks like.
 A developer's desk with a laptop showing code, papers with diagrams, coffee, and a plant.
Core User Experience Foundations
At the heart of any app people love are the features that make it feel effortless. A production-ready boilerplate doesn't just include these; it pre-configures them based on modern best practices, saving you weeks of head-scratching and complex setup.
- Robust Authentication: This is so much more than a simple email and password screen. A comprehensive solution should come with social logins (Google, Apple), passwordless options like magic links, and secure session management already built in. Honestly, building this securely from scratch is a huge task.
- Intuitive Navigation: People need to find their way around your app without thinking. This means having common navigation patterns—like stack, tab, and drawer navigators—already implemented and ready for you to customize. The boilerplate handles all the tricky wiring so you can focus on designing your app's flow.
- Efficient State Management: As your app gets more complex, keeping track of all its data can become a nightmare. A solid boilerplate will include a pre-configured state management library (think Zustand or Redux Toolkit) to ensure data is handled consistently and smoothly across every component.
These features are the non-negotiables. Without them, you're not just building an app; you're building the entire factory first.
The Modern Technical Stack
Beyond what the user sees, a professional boilerplate provides a modern, scalable backend and API layer. This is where most simple templates fall flat, leaving you to figure out how to connect all the backend services on your own.
A key differentiator of a production-ready kit is that it’s opinionated. It doesn't just hand you a box of parts; it delivers a fully assembled engine where authentication, the database, and the API are already wired together and optimized to work in harmony.
Look for a boilerplate that offers an integrated backend. For example, a kit like AppLighter is built on an edge-ready API layer using TypeScript and Hono, already connected to a scalable database like Supabase. This integrated approach means you have a full-stack application the moment you run the install command.
This technical foundation is critical. It gives your frontend a fast, reliable way to talk to your data, which is essential for building responsive apps that can handle real-world growth.
Integrated Tooling For Quality And Speed
A truly comprehensive React Native boilerplate thinks beyond the app's code. It sets up your entire development ecosystem, embedding tools that enforce quality and automate the boring, repetitive stuff. This focus on the developer experience is what separates a good starter kit from a great one.
Here are the essential integrations you should be looking for:
- Automated Testing Setup: The boilerplate should come with a testing framework like Jest or React Native Testing Library already configured. This makes it easy to write unit and integration tests from day one, which is crucial for keeping your app stable as you add new features.
- CI/CD Pipelines: Continuous Integration and Continuous Deployment (CI/CD) pipelines automate the whole process of building, testing, and shipping your app. A pre-configured pipeline (using something like GitHub Actions) can save your team countless hours and dramatically reduce the risk of human error during releases.
- Code Quality Tools: Tools like ESLint for finding code issues and Prettier for auto-formatting should be set up to run automatically. This keeps the codebase consistent, no matter who is writing the code, and helps catch common bugs before they become big problems.
These integrated tools create a professional workflow that naturally leads to higher-quality code and lets your team move faster. When this entire system is in place from the start, you can ship features with confidence, knowing your app is built on a reliable and maintainable foundation.
How The World's Biggest Companies Win With React Native
React Native isn't just for scrappy startups or side projects. It's a battle-tested technology trusted by global giants to deliver high-performance apps to millions of people every single day. When you look at how these household names build their mobile experiences, you start to see the true power and scale of the framework.
These success stories are powerful proof that a solid foundation built on React Native—the same kind you get from a quality React Native boilerplate—is more than capable of supporting enterprise-grade applications at a massive scale.
The Code-Sharing Advantage at Walmart
Walmart's move to React Native is a classic case study in efficiency. By embracing the framework, they achieved an incredible 95% code sharing between their iOS and Android apps. That single decision slashed their development overhead, letting them focus on one core codebase instead of managing two entirely separate ones.
Think about what that level of code reuse means in practice. It translates to fewer bugs, faster feature rollouts, and a more consistent user experience across every device. It's a strategic move that saves an immense amount of time and money, freeing up engineers to innovate rather than duplicate work.
Powering Global Commerce at Shopify
Shopify, the engine behind millions of online businesses, leans heavily on React Native for its core mobile apps, including the popular Point of Sale system. Their teams share around 80% of their code between iOS and Android, a huge win for a company that needs to ship reliable features at a breakneck pace.
For a platform like Shopify, performance is everything. Building with React Native allows them to fine-tune CPU and memory usage, ensuring their app feels snappy and responsive even when it's juggling complex inventory and payment tasks. This lets a smaller, more agile team punch well above its weight.
Starting with a boilerplate isn't a shortcut that compromises quality; it's a smart, strategic path toward building a robust, enterprise-grade product. The world's biggest apps prove that a shared codebase is a winning formula.
The success of these companies reveals a clear pattern: a unified codebase leads to faster development cycles and lower maintenance costs, all without sacrificing the native performance users demand.
Enterprise Adoption and Proven Results
The trend of big companies adopting React Native is only growing. In fact, over 40% of Fortune 500 companies use it to power their mobile applications, and boilerplates often serve as a major accelerator for their development teams.
Walmart's 95% code-sharing milestone led to huge cuts in time and cost. Shopify’s 80% reuse resulted in leaner teams and faster apps. And they aren't alone—giants like Uber Eats, Bloomberg, and Skype have also built massively successful apps on this foundation, delivering a seamless experience to millions. You can dig deeper into the React Native success stories behind Fortune 500 companies to see just how strategic this choice can be.
These examples all highlight the same crucial point: the core architecture of a React Native app is more than tough enough for the most demanding scenarios. When you start with a comprehensive React Native boilerplate like AppLighter, you’re adopting the same principles of efficiency and scalability that these industry leaders have already proven work.
How To Choose The Right Boilerplate For Your Project
The React Native ecosystem is booming, and picking the right React Native boilerplate can feel overwhelming. But this is one of those decisions you have to get right from the start. Choosing well now saves you from tangled codebases and painful refactoring projects down the road.
This isn't just about grabbing the one with the longest feature list. It’s about finding a foundation that genuinely fits your team’s expertise, your project's needs, and where you see the app going in the long run. Let's walk through what really matters.
 Two developers collaborating on coding and software development in an office environment.
Evaluate The Core Technology Stack
The first big question you need to answer is: Expo or bare React Native? Your choice here will fundamentally shape how you build and deploy your app.
-
Expo-based Boilerplates: These are a godsend for getting things done quickly, which is why they’re so popular with startups and solo developers. Expo handles a ton of the tricky native configuration behind the scenes, so you can get up and running and push updates much faster. A great example is AppLighter, which uses Expo to provide a complete, ready-to-go development environment.
-
Bare React Native Boilerplates: These give you total control. If your app needs custom native code or has to interact with specific hardware that Expo doesn’t cover, a bare workflow is your only real option. That power comes with a price, though—you're responsible for managing the native build processes for both iOS and Android yourself.
For the vast majority of apps, an Expo-based boilerplate hits the sweet spot. It gives you incredible development speed without locking you out of powerful native features if you need them later.
Distinguish Between Templates And Frameworks
You also need to understand if you're looking at a simple "template" or a more "opinionated framework." A template might just give you a pre-organized folder structure, leaving it up to you to wire everything together.
An opinionated framework, however, is a different beast entirely. It's a fully integrated system.
An opinionated boilerplate delivers a complete, cohesive architecture where authentication, state management, and the API layer are already wired together and optimized to work seamlessly. This integration is what truly accelerates development.
This pre-integrated setup is a massive head start. It guides you toward best practices from day one and ensures all the foundational parts of your app are built to work together, creating a stable platform you can build on.
Assess The Ecosystem And Support
A boilerplate is more than just its code; it's a living project. The health of its community and the quality of its support can make or break your experience. As you compare options, keep an eye out for these tell-tale signs of a well-run project.
- Documentation Quality: Is the documentation actually helpful? Clear, thorough docs are a hallmark of a project that’s cared for and will save you hours of guesswork.
- Community and Support: Is there an active GitHub or Discord community? When you hit a wall, having a place to ask questions and get answers from people who've been there before is invaluable.
- Update Frequency: Check the commit history. A boilerplate that’s updated regularly will keep pace with the latest versions of React Native and its dependencies, which is critical for security and performance.
These clues tell you a lot about the project's long-term health. Choosing a well-supported React Native boilerplate means you won't be left high and dry with an abandoned codebase. The framework itself is only getting more popular; React Native's market share for new cross-platform apps jumped from 4.73% in 2022 to about 6.75% in 2024. This growth is driven by how fast and cost-effective it is. If you want to dive deeper, you can explore the latest React Native market insights to see why it's becoming such a dominant force.
Answering Your Questions About React Native Boilerplates
Whenever you're thinking about a new way to build software, a bunch of questions pop up. It's only natural. For developers and founders looking at React Native boilerplates, the big concerns are usually about the trade-offs, how flexible they really are, and what it all means for the long haul.
Getting straight answers is the only way to feel good about the decision. So, let’s tackle the most common questions we hear and cut through the noise. We'll get into what really separates a boilerplate from a simple template, talk about scalability, and explain how a great starting point can set you free instead of locking you in.
What's The Difference Between A Boilerplate And A Template?
People often throw these two terms around like they’re the same thing, but they’re fundamentally different. Getting this right is key to knowing what you’re actually getting.
A template is little more than an empty file structure. It gives you some pre-made folders and maybe a few config files, but that’s about it. You're still on the hook for wiring everything up—connecting libraries, setting up services, and making sure all the pieces play nicely together.
A boilerplate, on the other hand, is a living, breathing, and opinionated framework.
Think of it like this: a template gives you an empty toolbox. A boilerplate gives you a pre-assembled engine, tuned and ready to drop into your car.
It’s an integrated system where essentials like authentication, navigation, and state management are already configured, tested, and working together. That’s the magic that saves you hundreds of hours of grunt work. You’re not just getting a starting point; you're getting a production-ready foundation so you can start building your actual features on day one.
Is A React Native Boilerplate Suitable For Large, Scalable Applications?
This is a big one. Nobody wants to take a shortcut now only to hit a massive roadblock later. So, can a boilerplate handle a large, successful app? The answer is a hard yes—if you choose a quality one.
A true production-ready boilerplate is designed from the ground up for scale. It’s not just a grab bag of popular libraries; it’s an architecture built with battle-tested practices and technologies that power some of the biggest apps in the world. The core is engineered to handle growth without creaking at the seams.
For instance, a solid boilerplate already includes an efficient state management solution and is built to connect to a scalable backend. This means your app’s performance won't tank when you go from a hundred users to a million. You won’t need to tear everything down and start over. By building on this kind of foundation, you're actually taking a huge risk off the table.
Can I Customize A Boilerplate, Or Am I Locked Into Its Choices?
The fear of being painted into a corner is real, and flexibility is everything. A good React Native boilerplate should give you a strong foundation without building a cage around you. The whole idea is to speed you up, not hold you back.
You get full access to the source code. That means you have total freedom to change, replace, or build on top of any part of it. The boilerplate takes care of the 80% of work that's the same for almost every app—things like setting up login screens, password resets, and navigation stacks.
This frees you up to pour your time and energy into the 20% that makes your app special. You can:
- Swap out libraries: Don't like the default state management tool? Rip it out and plug in your favorite.
- Extend functionality: Need to add a custom native module or integrate a niche third-party API? Go for it.
- Customize the UI: The included components are just a starting point. Style them, replace them, and make them match your brand perfectly.
The boilerplate is the launchpad, not the destination. It’s designed to give you a massive head start, not to put up walls.
How Does A Boilerplate Help Non-Technical Founders?
For founders who don't live and breathe code, a boilerplate is an incredible asset for de-risking a new venture. It hits the three biggest pain points: time, cost, and predictability.
First, it shrinks your time-to-market dramatically. You can have a working MVP in weeks instead of months because you’re not wasting time and money building basic infrastructure from scratch. This lets you get your idea in front of users fast, gather real feedback, and see if you’re onto something before you run out of cash.
Second, it makes development predictable. When you hand a developer a stable, well-architected system, their job becomes much clearer. You’re not asking them to build a car from a pile of metal; you’re asking them to add the custom paint job and a great sound system. This leads to shorter deadlines, more accurate cost estimates, and a much smoother road to launch.
Ready to stop building from scratch and start shipping faster? AppLighter gives you a complete, production-ready React Native boilerplate with everything you need to launch your next great app. Get your foundation at https://www.applighter.com.
Related Articles
Discover react native app starter: Fast, Practical Mobile App Bootstrapping
Kick off your project with a proven react native app starter, and learn setup, testing, and deployment with practical examples.
React Native App Template: Jumpstart Your Mobile Project Today
Discover how the react native app template can speed up development and streamline onboarding. Learn what features to look for to boost your mobile app start.

What Is Cross Platform App Development A Guide for Modern Teams
Uncover what is cross platform app development and how it works. This guide compares top frameworks and shows you how to build apps faster and more efficiently.