How to Change App Name in React Native and Expo
Learn how to change app name across Expo, React Native (iOS/Android), and the app stores. Our guide covers every step from your code to the marketplace.

Renaming your app seems straightforward on the surface, but it's a bit more involved than just swapping out some text. You'll need to dig into specific configuration files—app.json for Expo projects, or Info.plist on iOS and strings.xml on Android if you're working with bare React Native. It’s a process that demands precision, touching both the name users see and the internal IDs that make your app work.
Understanding Your App's Different Names
Before you touch a single line of code, it’s crucial to get one thing straight: your app doesn't have just one name. It actually has several different identifiers, and mixing them up is one of the most common ways to trigger build failures or get an app store rejection. Trust me, getting this right from the start will save you from a world of debugging headaches down the road.
I like to think of it like a person's identity. You have your full legal name (the unique identifier), a nickname everyone calls you (the display name), and a social security number (the package name). Each one has a specific job, and you can't just use them interchangeably. Your app works the same way.
The Three Core App Identifiers
When you're dealing with app naming, you'll constantly run into three main identifiers: the Display Name, the Bundle Identifier (for iOS), and the Package Name (for Android). Each plays a very distinct role.
- Display Name: This is what everyone sees. It's the name under your app icon on the home screen, in the App Store, and in search results. Think of it as your marketing name; you can change it to better align with your brand.
- Bundle Identifier (iOS): This is a unique string, usually in a reverse-domain format like
com.applighter.myapp. It’s how Apple’s entire ecosystem identifies your app—it’s essential for push notifications, updates, and other core services. - Package Name (Android): This is Android’s version of the Bundle ID. It’s the unique identifier for your app on the Google Play Store and on every device it's installed on. It also typically follows that same reverse-domain style.
This diagram does a great job of showing how these three pieces fit together.
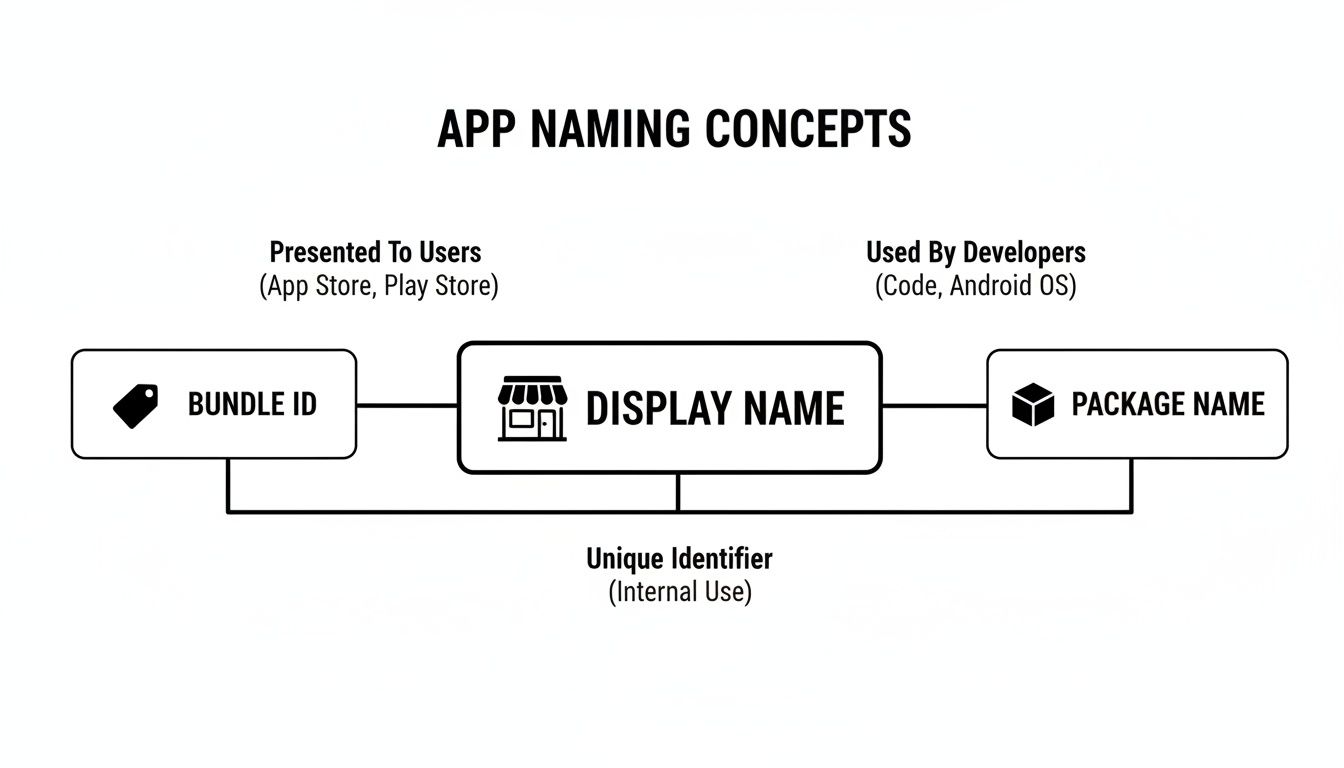 Diagram illustrating app naming concepts: Display Name for users, Bundle ID, and Package Name for developers.
As you can see, the "Display Name" is for the user, while the "Bundle ID" and "Package Name" are for the developers and the app stores themselves.
To make this crystal clear, I've put together a quick-reference table that breaks down what each identifier is, where you'll find it, and why it matters.
App Identifier Breakdown: What You Need to Know
| Identifier Type | What It Is | Where It's Used | Key Consideration |
|---|---|---|---|
| Display Name | The public-facing name of your app. | Home screen, app stores, search results. | Can be changed for marketing. Keep it consistent across platforms. |
| Bundle ID (iOS) | A unique, internal identifier for iOS. | Apple's ecosystem, Xcode, push notifications. | Cannot be changed after the app is published. |
| Package Name (Android) | A unique, internal identifier for Android. | Google Play Store, Android OS, Gradle files. | Cannot be changed after the app is published. |
Keep this table handy. It’s a simple cheat sheet that can prevent some major mistakes, especially when you're getting ready to publish or update your app.
Why This Distinction Matters
Getting these identifiers mixed up can completely stop a release in its tracks. For instance, if you change the display name in your code but forget to update it in App Store Connect, Apple will almost certainly reject your submission for having inconsistent metadata.
One of the most catastrophic mistakes I've seen developers make is changing the Bundle ID or Package Name of an app that's already live. The app stores will see it as a brand-new app, not an update. This severs the connection to all your existing users—they won't get any future updates and would have to find and download the "new" app, losing all their data in the process.
From a technical standpoint, the Bundle ID and Package Name are the foundation. They’re hardcoded into your native project files and must perfectly match what you’ve registered in your Apple Developer and Google Play Console accounts. If they don’t, your builds will fail, or you won’t be able to upload your app. Knowing how to properly change an app's name means knowing exactly which identifier to touch for your specific goal.
If you're working within the Expo managed workflow, you're in luck. Changing your app’s name is far simpler than in a bare React Native project. Instead of hunting through native iOS and Android folders, you can handle almost everything from a single configuration file.
This central hub for your project's identity is either app.json or app.config.js. It’s the source of truth for your app's metadata—from icons and splash screens to the name that users will see on their home screens.
Find and Edit Your Core Config File
First things first, pop open your project's root directory and find your app.json or app.config.js file. Inside, you’ll see a main expo object. The property we care about here is name.
This is the display name Expo uses to generate the native builds for both platforms. So, if you set "name": "Awesome New App", that's what will appear on a user's device.
 Two mobile phones and an open laptop with "Know Your Names" on its screen on a wooden table.
This file structures everything neatly, making it clear where you need to make your edits without digging into platform-specific code.
Don't Just Stop at the Display Name
A proper rebranding goes deeper than just one line of text. When a name changes, so does the branding. To keep the user experience consistent, you'll want to check a few other related properties in your configuration file.
Make sure you also update:
expo.icon: This points to your app's icon file. A new name often comes with a new logo, so be sure to swap this out.expo.splash: This is the image users see when your app boots up. If the old name was part of the splash screen design, you’ll definitely want to update it.expo.slug: This is the URL-friendly name used for your project's Expo Go URL (e.g.,expo.dev/@username/my-new-app). It’s smart to update this to match the new name for clarity.
Updating these all at once creates a cohesive feel. Nothing looks more jarring than a new app name sitting under an old icon. It's a small detail, but getting it right shows a level of polish that builds user trust.
A Quick Tip from Experience: After changing your
app.json, always clear out old build artifacts before you generate a new build. Cached files can sometimes cause the old name to pop back up unexpectedly. Runningnpx expo prebuild --cleanis the best way to force a clean slate and ensure your new name sticks.
Pushing and Verifying Your Changes
Once you’ve saved your configuration updates, it’s time to see them in action. If you're using the Expo Go app for development, a quick restart of your dev server and maybe clearing the app's cache on your phone should do the trick.
For production, the process is just as simple. When you run eas build, Expo Application Services (EAS) reads your updated app.json and generates fresh iOS and Android builds with the new name baked right in.
Before you send anything off to the app stores, I highly recommend running a quick local check. Use the prebuild command to generate the native ios and android folders locally. This lets you peek inside the native files (Info.plist on iOS and strings.xml on Android) to confirm the new name has been applied correctly. This one step can save you the headache of a failed build or a rejected app submission down the line.
Navigating Name Changes in Bare React Native
If you're working with a bare React Native project or have ejected from Expo, changing your app's name is a much more hands-on affair. Forget the single config file; you'll be diving straight into the native iOS and Android project files. While this gives you granular control, it also means you need to be careful to avoid breaking your build.
When you leave the managed workflow, you're essentially taking the wheel. Think of it like switching from an automatic to a manual car—you have more direct control, but you need to know exactly which gears to shift and when. Let's walk through the right way to do this on both platforms.
 A laptop displaying an app editor screen for "App. Config. Js," alongside a card reading "Expo App Name" and a smartphone.
Modifying the App Name on iOS
On iOS, the display name—the text users actually see under your app icon—is handled inside your Xcode project. You won't find this setting anywhere in your JavaScript code. The key lies in a file called Info.plist.
First, open your project’s ios directory and launch the .xcworkspace file in Xcode. With your project loaded, find the Info.plist file in the project navigator panel. You're looking for a specific key: Bundle display name.
If the key is already there, just edit its value to your new app name. If you don't see it, you'll need to add it. Click the small plus (+) icon to add a new row, select "Bundle display name" from the dropdown list, and then type in its new value. This change directly controls what appears on the user's home screen.
An Alternative Method in Xcode Settings
There’s another way to do this that I often prefer because it feels more integrated with the standard Xcode workflow. You can manage the name directly through the project's target settings.
Here’s how you do it:
- In the Xcode project navigator (the left-hand panel), click on the top-level project file.
- Select your main app target from the “TARGETS” list.
- Navigate to the “General” tab.
- Look for the “Identity” section. You'll see a field labeled
Display Name.
When you update the name here, Xcode automatically updates the Info.plist file for you. It's a cleaner, more visual approach to get the same result. Just remember to save your changes before trying to rebuild the app.
Handling the Name Change on Android
The process on Android is conceptually the same, but you'll be working with different files and, most likely, a different IDE: Android Studio. Here, the app's name is stored in a dedicated resource file, which makes things like localization much easier down the road.
The file you need to edit is strings.xml. You can find it at android/app/src/main/res/values/. Pop that file open, and you should see a line that looks something like this:
<string name="app_name">YourOldAppName</string>
Simply replace "YourOldAppName" with your shiny new display name. That’s it. This file acts as the single source of truth for your app's name within the Android project.
It's a best practice in native Android development to keep strings in
strings.xml. This prevents hardcoding text directly in your layouts or manifest. By doing this from the start, you make it incredibly easy to support multiple languages later—you'd just add a newstrings.xmlfor each language you want to support.
After you've updated strings.xml, it’s always a good idea to quickly check your AndroidManifest.xml file, which lives at android/app/src/main/. Make sure the android:label attribute inside the <application> tag is correctly pointing to your string resource: android:label="@string/app_name". This little reference tells the Android system where to pull the name from.
What About the Bundle Identifier and Package Name?
Changing the display name is a fairly safe and simple tweak. But changing the Bundle Identifier (iOS) or Package Name (Android) is a whole different ballgame—and a much more delicate operation.
These unique identifiers are your app's true identity on the App Store, the Play Store, and on every user's device. For an app that's already published, changing this is almost always a bad idea. The stores will treat it as a completely new app, severing the link to your existing users and reviews.
If you’re still early in development and absolutely need to change it, use a dedicated tool. Packages like react-native-rename can automate this process and help you avoid a world of pain. These scripts are designed to comb through your entire project—Gradle files, Xcode project settings, folder names—and replace every single instance. Trying to do this manually is a recipe for disaster; a single missed reference can lead to cryptic build failures that are a nightmare to debug.
Updating Your Name on the App Store and Google Play
You’ve dug through the configuration files and changed your app’s display name in the code. Job done, right? Not quite. What you’ve handled is the name that appears under the icon on a user’s device. The name that millions of potential customers see on the Apple App Store and Google Play Store is a completely separate beast.
These storefronts have their own metadata, and your app's public name is a critical part of it. This part of the process isn't about code; it's about navigating each platform's developer portal. Getting this right is crucial—a mismatch between the name in your build and your store listing is a classic reason for a frustrating rejection from a review team.
Navigating App Store Connect for iOS
For anyone with an iOS app, your next stop is App Store Connect. Apple is famously strict about the app name, treating it as a core piece of metadata. You can't just edit it on the fly; the change has to be tied to a new version submission.
So, you’ll need to prepare a new app update.
First, log in to App Store Connect and head to your app's dashboard. Under the "App Store" tab, you'll need to create a new version by hitting the "+" button next to "iOS App." This creates a new draft release where you can make your changes.
On the new version's page, find the "App Information" section. This is where you'll see the Name field—the one that really counts for the store.
Keep in mind, Apple gives you a tight 30-character limit here, so every letter counts. Make it memorable and clear, as this is prime real estate for app store optimization (ASO).
Remember, this change won't go live until your app update is submitted and passes Apple's review process. Plan your name change around your release cycle to avoid delays.
Once you’ve updated the name, you’ll go through the standard submission process: upload your new build from Xcode, update your release notes, and send it off for review. The review team will be looking for consistency, so make sure the name you enter here matches the displayName in your build.
Making the Change in the Google Play Console
Over on the Android side, Google’s process is a lot more relaxed. You can update your app’s public name in the Google Play Console at any time, and the change usually goes live within a few hours without requiring a whole new app update.
Here’s the game plan:
- Sign in to the Google Play Console and select your app.
- From the left-hand menu, go to "Store presence" and then click "Main store listing."
- The very first field is Title. That's your app's public name on Google Play.
Google is more generous with space, giving you up to 50 characters for the title. This is a great opportunity to add a short, keyword-rich descriptor to help people find your app. For instance, instead of just "PhotoEdit," you could go with "PhotoEdit - AI Photo Editor."
After typing in your new title, just scroll down and hit "Save." Google will review the change, but it’s a much faster turnaround. This flexibility is fantastic if you want to A/B test different names or make quick branding tweaks.
Choosing the right name is both an art and a science. Your app's title is one of the most powerful signals for store search algorithms. A smart name change can directly influence your app's visibility and, ultimately, its download numbers. Before you lock anything in, do some keyword research and take a peek at what your competitors are doing. A great name doesn't just identify your app; it helps the right users find it in the first place.
Common Pitfalls When Renaming Your App
Figuring out how to change your app's name feels like a simple task, but it’s a path riddled with traps that can cause some serious headaches. I've seen even experienced developers get tripped up by this. A seemingly tiny mistake can spiral into frustrating build failures, app store rejections, or even breaking the connection with your existing users.
Getting this right is about more than just following a checklist; it's about understanding why you're making each change. Let’s walk through the most common mistakes people make and, more importantly, how you can sidestep them for a smooth renaming process.
Forgetting to Clean Your Build Cache
This is, without a doubt, the #1 issue that trips people up after a rename. You've painstakingly updated every config file, you've double-checked your app.json and Info.plist, but when you fire up the build, the old name stubbornly reappears. It’s the kind of thing that makes you question if you’re seeing things.
The culprit is almost always a stale build cache. To speed up build times, tools like Xcode and Android Studio cache a ton of compiled code and resources. When you change something like a display name, they don't always pick up on it and just reuse the old, cached assets.
Thankfully, the fix is simple, though absolutely essential: always perform a clean build.
- For iOS: In Xcode, just head to
Product>Clean Build Folder. - For Android: In Android Studio, it's
Build>Clean Project. - For Expo/EAS: The command you want is
npx expo prebuild --clean. This wipes the native directories and rebuilds them from scratch based on your latest config.
This forces a fresh start, ensuring your new name gets picked up everywhere. It adds a few extra minutes to your build, but trust me, it can save you hours of debugging.
Mismatching Store and Build Identifiers
Another classic mistake is letting your code and your app store listings get out of sync. For example, you might update the package name in your Android project to com.newco.app but completely forget to create a new app listing with that same ID in the Google Play Console. The result? You go to upload your build, and Google immediately rejects it with a vague error, all because it can’t find a matching app ID.
The same logic applies to iOS. Your build’s Bundle Identifier must be a perfect match for the one you registered in App Store Connect.
Your app's bundle identifier or package name is its permanent, unique fingerprint. Once you submit an app to the store with a specific ID, that ID is locked in forever. Changing it means you are, in the eyes of the store, creating an entirely new application.
Before you even think about uploading, do a quick sanity check. Make sure those core identifiers are identical across your local project, your Apple Developer account, and your Google Play Console. This simple check prevents nearly all upload failures related to app identity.
Underestimating the Impact on Live Apps
If your app is still in development, changing identifiers is just an annoyance. But for a live app with real users, it can be a catastrophe if you're not careful. The single biggest mistake you can make is changing the package name or bundle identifier of a published app.
Doing this instantly severs the update path for every single one of your current users. They will never receive another update because the app store now sees your "renamed" app as a completely different product. Any services tied to this ID, like push notifications or analytics, will also break immediately.
While you won't find many market reports on this specific issue, developer forums are filled with cautionary tales. The mobile app market is projected to hit a staggering USD 745.36 billion by 2030, making user retention more critical than ever. Losing your entire user base over a preventable mistake is a tough lesson to learn. You can discover more insights about the growing mobile market and its key players on fortunebusinessinsights.com.
If you absolutely must rebrand a live app, stick to changing the display name and the store listing title only. Leave those core identifiers alone to maintain that vital link to the people who already use and love your product.
Frequently Asked Questions About Changing App Names
 Laptop screen shows 'Rename Safely' and app icon. A sign lists 'iOS/ Build', 'Android/ App Build', with a smartphone.
When you start talking about renaming an app, a lot of questions pop up. It’s a process filled with little details that can trip you up, from store policies to the technical nitty-gritty. I've been there, and I’ve seen these same questions come up time and time again in the dev community. Let’s clear the air and tackle them head-on.
How Often Can I Change My App Name?
This really boils down to which app store you're dealing with. The rules of the game are quite different between Google and Apple, and it's something you have to factor into your strategy.
Over on the Google Play Store, you've got a decent amount of leeway. You can hop into the Google Play Console, update your app's title, and the change usually appears for users within a few hours. This is great if you want to make quick adjustments or even A/B test a couple of names to see which one performs better.
Apple's App Store, on the other hand, is much stricter. The app name is considered a fundamental piece of your app's metadata, and it's locked to a specific version. That means you can only change the name when you submit a brand-new build for review. It’s a much slower, more deliberate process, so you need to plan any name changes to align with your release cycles.
Key Takeaway: Both stores are on the lookout for bad actors. You can change your display name, but they have zero tolerance for keyword stuffing or using misleading names just to climb the search rankings. Make sure any change genuinely reflects your app's purpose, or you risk getting rejected or even suspended.
Will Changing My Display Name Affect Existing Users?
This is probably the most critical question, and the answer is a classic "it depends" on what you're actually changing.
If you’re just updating the display name—that's the text label people see under your app's icon on their phone—then no, your existing users will be fine. When they download the next update, the new name will simply replace the old one. All their data, settings, and login information will carry over without a hitch.
But it’s a whole different ballgame if you mess with the underlying bundle identifier (on iOS) or the package name (on Android). These are the unique IDs the app stores use to identify your app in their system. Changing one of these is like giving your app a new social security number; the store sees it as a completely different app.
Doing this severs all ties to your existing user base. They won't get your update, and they'd have to go find and download your "new" app from scratch, losing all their data in the process. This is something you only do for a complete relaunch, and it's almost never the right move for an app that's already live.
What Is the Difference Between the App Name and Package ID?
It's super common to mix these two up, but they serve completely different roles. A good analogy is a book: the app name is the title on the cover, while the package ID is the unique ISBN barcode on the back.
-
App Name: This is your marketing name. It's what users see and search for. It's meant to be memorable and descriptive. You can, and often should, change it to better reflect your brand. This name is stored in files like
strings.xmlfor Android orInfo.plistfor iOS. -
Package ID / Bundle Identifier: This is the app's unique fingerprint for the operating system and the app stores. It’s almost always in a reverse-domain format like
com.yourcompany.yourapp. Its only job is to be a unique identifier so that updates go to the right users and backend services like push notifications know where to send messages.
Do I Need to Run Expo Prebuild After a Name Change?
Yes, 100%. If you're working in an Expo project, this is a step you absolutely cannot skip.
When you change the display name or any other native setting in your app.json or app.config.js, Expo doesn't magically sync those changes to the native ios and android project files. You have to tell it to.
Running npx expo prebuild is how you make that happen. It reads your configuration and regenerates the native directories with all your new values. Even better, the best practice is to run it with the --clean flag: npx expo prebuild --clean.
Using --clean wipes the old native directories before rebuilding them. This is crucial because it gets rid of any old, cached files that could cause weird conflicts or bugs. It ensures your native projects are a perfect, clean reflection of your latest config, guaranteeing your new app name shows up correctly everywhere.
Ready to skip the tedious setup and focus on building features? AppLighter is a production-ready starter kit for Expo and React Native that comes pre-configured with everything you need, from authentication and navigation to state management and AI tooling. Build and ship your next mobile app faster than ever. Get started at https://www.applighter.com.
Related Articles

React Native Maps Guide 2026: Google Maps + Best Libraries
A practical guide to integrating React Native Google Maps in Expo. Learn to set up API keys, add custom markers, optimize performance, and ship your app.

Explore charts react native: Build Interactive Charts in Mobile Apps
Practical guide to charts react native: choose libraries, connect data with Supabase, and optimize performance for Expo apps.

A Developer's Guide to Debugging React Native Apps
Struggling with bugs? Learn modern workflows for debugging React Native and Expo. Master tools, performance profiling, and fix issues faster.