Create an App Without Coding A Founder's Practical Guide
Ready to create an app without coding? This practical guide walks you through planning, building, and launching your app using powerful no-code platforms.
Of course, you can absolutely create an app without coding. The whole game has changed. Powerful visual tools are now readily available, letting entrepreneurs, designers, and business owners build fully functional apps with drag-and-drop interfaces and pre-built logic.
The No-Code Revolution: Building Your App Is Easier Than Ever
Ever had a killer app idea but hit a wall because you don’t know how to code? For decades, that was a dealbreaker. It kept countless brilliant concepts stuck on the whiteboard, since traditional development meant either hiring pricey developers or spending ages learning complex programming languages yourself.
That’s not the world we live in anymore.
 Person pointing at a laptop screen displaying a no-code app builder, with a 'NO-CODE APPS' banner.
The ability to create an app without code has truly democratized software creation. Think of it like this: you're building with LEGOs instead of trying to forge your own steel beams. You’re not writing line after line of code; you’re visually snapping together pre-made components for user logins, buttons, data displays, and more.
This isn’t just some niche trend, either. It’s a massive movement that's reshaping the entire software industry. The no-code market is exploding. By 2026, some experts predict a mind-boggling 500 million apps will be built using no-code platforms.
That means 65% of all app development will happen on these tools. This incredible growth highlights a simple truth: you don't have to be a developer to build software anymore. You can dive deeper into the growth of the no-code market and its impact on app development.
What No-Code Really Means for You
So, what does this actually look like in practice? No-code platforms give you a visual environment that hides all the intimidating programming complexity. Instead of wrestling with syntax and servers, you get to focus purely on what your app looks like and how it works.
This approach brings some huge advantages to the table:
- Launch Way Faster: You can build a prototype or a Minimum Viable Product (MVP) and get it into users' hands in weeks, sometimes even days—not months.
- Slash Your Costs: It dramatically lowers the financial hurdle. You don't need to hire a full development team to get your idea off the ground.
- You're in Control: As the founder or creator, you're in the driver's seat. You can directly turn your vision into a real product and make changes on the fly based on feedback.
- True Empowerment: This is huge for non-technical founders, marketers, and operations managers. You can build the exact tools you need without waiting on the IT department.
At its core, no-code is about lowering the barrier to creation. It’s a creative equalizer, giving anyone with a great idea the tools to build it, test it, and share it with the world.
Traditional Coding vs. No-Code Development At a Glance
To really see the difference, a side-by-side comparison makes it clear. While both approaches have their place, no-code gives you a major head start when you're just trying to get an idea off the ground.
This quick table breaks down the key distinctions to help you decide which path makes sense for your project right now.
| Aspect | Traditional Coding | No-Code Development |
|---|---|---|
| Skill Requirement | Specialized programming knowledge (e.g., Swift, Kotlin, JavaScript) | Logic, design thinking, and platform-specific knowledge |
| Development Time | Months to years | Days to weeks |
| Initial Cost | High (developer salaries, infrastructure) | Low (platform subscription fees) |
| Flexibility | Unlimited customization and unique functionality | Limited by the platform's features and integrations |
| Best For | Highly complex, scalable, and custom applications | MVPs, internal tools, and straightforward business apps |
Ultimately, choosing to create an app without coding is about using speed and agility to see if your idea has legs in the real world, without betting the farm to find out.
Developing Your App's Blueprint for Success
 Overhead view of an app development workspace featuring a tablet displaying a blueprint and a smartphone.
The excitement to create an app without coding often makes people dive headfirst into a no-code builder. But this is like starting a road trip with no map—you’ll get lost, waste time, and probably have to turn back. A little upfront planning is the single best thing you can do to ensure your project succeeds.
This planning phase, or blueprinting, is where you translate your abstract idea into a concrete plan of action. It prevents you from getting bogged down by technical details too early and forces you to think like your future users. Without a blueprint, you risk building features nobody wants or creating a confusing user experience.
Crystallize Your Core Idea
Before you drag a single button onto a screen, you need absolute clarity on two things: what your app does and who it's for. This isn't about writing a long business plan; it's about a simple, powerful statement.
Start by answering this question: What single, specific problem does my app solve? Avoid vague answers like "it helps people be more productive." Get specific. For example, "it helps freelance writers track their billable hours across multiple projects so they never lose income."
Once you know the problem, define your target user. Who is feeling this pain most acutely? Is it a student, a small business owner, a busy parent? A clear user persona guides every decision you make, from the visual design to the text on each button.
An app that tries to be for everyone ends up being for no one. Laser-focus on solving one problem for one type of user, and you’ll build a product people actually need and love.
Map Out the User Journey
With your core idea defined, the next step is to map out the user flow. This is the path a person takes through your app to achieve their goal. Think of it as storyboarding the entire experience from start to finish.
Don't overcomplicate this. You can use a simple whiteboard, sticky notes, or free tools like Miro or Whimsical. The goal is to visually outline every screen and every action a user can take.
For our freelance writer app, a user flow might look like this:
- Onboarding: User signs up with an email and password. They are then prompted to create their first client and project.
- Dashboard: The main screen shows a list of active projects and total untracked time. A large "Start Timer" button is prominently displayed.
- Time Tracking: Tapping the timer button starts a clock for a selected project. The user can add notes to the session.
- Viewing Reports: The user can navigate to a reports screen to see hours logged by project, client, or date range, with an option to export.
Mapping this out reveals potential friction points before you've built anything. It ensures the experience is logical and intuitive, which is crucial for keeping users engaged.
Plan Your App's Data Structure
This sounds more technical than it is. Data modeling is simply deciding what information your app needs to store to function. It’s the skeleton that holds everything together. For a no-code project, this is about identifying your main "collections" or "databases."
Think about the key nouns in your app. For the time-tracking app, the essential data would be:
- Users: Each user needs an email, password, and name.
- Clients: A client has a name and contact information. Each client can have multiple projects.
- Projects: A project has a name and an hourly rate. It must be linked to a specific client.
- Time Entries: Each entry needs a start time, end time, and notes. It must be linked to a project.
By outlining these relationships, you create a logical foundation for your app. When you get into the no-code builder, you'll know exactly what databases to create and how they should connect. This simple planning step will save you dozens of hours of frustrating rework later on.
Choosing the Right No-Code Platform for Your Project
Picking your no-code platform is the single most important decision you'll make in this entire process. Honestly, it's less like choosing a piece of software and more like bringing on a co-founder. The platform you commit to will dictate what you can build, how quickly you can move, and ultimately, how much this venture will cost you.
The market is flooded with options, and it's easy to get analysis paralysis. Each platform has its own philosophy. Some are brilliant for creating simple, beautiful mobile apps, while others are powerhouse tools for building complex web applications that can go head-to-head with custom-coded software. Your first job is to find the one that truly fits the blueprint of your idea.
Start With Your App's Core Purpose
Before you even glance at a pricing page, you need to get crystal clear on what your app actually is. Is it a true native mobile app destined for the App Store and Google Play? Or is it a powerful web app that lives in a browser? This one question will cut your list of potential platforms in half.
-
For Native Mobile Apps: If you need access to a phone’s hardware—think push notifications, GPS, the camera, or offline functionality—you need a platform built specifically for that. Tools like Adalo or Glide are designed from the ground up to create apps that feel at home on a user's phone.
-
For Complex Web Apps: If your idea involves intricate backend logic, custom user workflows, or a powerful database, then Bubble is the undisputed king. It gives you the raw power to build almost anything you can dream up, from a social network to a full-blown SaaS product. Just remember, it’s built for the web.
-
For Internal Tools & Simple Automations: Maybe you just need a custom CRM for your sales team or a quick inventory management tool. This is where platforms like Softr shine. They let you spin up incredibly useful interfaces on top of data you already have in Airtable or Google Sheets.
What to Look for in a No-Code Builder
Once you've zeroed in on the right category, it's time to compare your top contenders. Don't just pick the most popular one. You need to weigh them against the specific, real-world needs of your project.
It all boils down to a balance of four things: the learning curve, integration options, scalability, and of course, your budget. Getting this balance wrong can lead to some painful roadblocks later on.
Picking a no-code platform isn't just about the features it has today. It's about ensuring it can grow with your vision for tomorrow. Ask yourself: can this tool handle 10,000 users? Can it connect to the payment gateway I absolutely need?
Thinking ahead like this saves you from the nightmare scenario: having to rebuild everything from scratch on a new platform a year from now. That’s a mistake that costs a ton of time and money.
Top No-Code Platform Comparison
To give you a head start, let's break down a few of the major players in the space. This table gives you a quick snapshot of where each tool shines, helping you match a platform to your project's DNA.
| Platform | Best For | Key Features | Pricing Model |
|---|---|---|---|
| Bubble | Complex web applications, SaaS products, marketplaces | Visual workflow editor, full database control, extensive plugin library | Free tier, then paid plans based on "workload units" |
| Adalo | Native mobile apps (iOS & Android) and simple web apps | Drag-and-drop UI builder, easy App Store publishing, component marketplace | Free tier, with paid plans unlocking more users and features |
| Glide | Data-driven mobile and web apps, internal tools | Builds apps from spreadsheets (Google Sheets, Airtable), fast development | Free tier available, paid plans for more users and data |
| Softr | Web portals, client dashboards, and internal tools | Integrates seamlessly with Airtable and Google Sheets, pre-built blocks | Free tier, with paid plans for custom domains and more users |
This isn't some fringe movement anymore; it's how modern applications are being built. Businesses need to launch and adapt faster than ever, and no-code is the answer. In fact, Gartner predicts that by 2026, a massive 75% of new enterprise applications will be built using low-code or no-code technologies.
The foundation for your entire app rests on this decision. So take your time. Sign up for a few free trials. Try building a tiny piece of your app in your top two choices. Nothing beats hands-on experience for figuring out which one just feels right for you and your vision.
From Visual Design to Live Data: Bringing Your App to Life
You've got a solid plan and you've picked your no-code platform. Now for the fun part: rolling up your sleeves and actually building the thing. This is where the abstract ideas in your head and the sketches on your notepad start turning into a real, functional application. Forget writing lines of code; think of this as a digital construction project where you're snapping together pre-built components.
The process almost always starts with the user interface (UI)—what your users will see and touch. Most no-code builders make this a drag-and-drop affair. You'll literally pull elements like buttons, text fields, and image galleries from a library and arrange them on a blank canvas. Your main job here is to bring the user flows you mapped out earlier to life, one screen at a time.
What’s so great about this is the immediacy. You can shift an element, tweak a color, or change a font and see the result instantly. It gives you a real feel for the app as you build it. The trick is to stay focused on creating an intuitive user experience (UX). Keep your design clean, consistent, and dead simple to navigate.
Structuring Your App's Database (It's Not as Scary as It Sounds)
If the UI is the face of your app, the database is its brain. This is where all the crucial information lives—user profiles, product listings, posts, you name it. The word "database" can sound intimidating, but in a no-code world, it's surprisingly straightforward. You’re essentially just creating smart, interconnected spreadsheets.
Using the data model you already planned, you’ll set up different "collections" (or tables) for each type of data. Imagine you're building a simple social media app. You'd likely need:
- A Users Collection: This holds everything about your users—name, email, profile picture, etc.
- A Posts Collection: This stores the post content, when it was created, and importantly, who created it.
- A Comments Collection: This table saves the comment text, linking it back to the original post and the user who wrote it.
The real magic happens when you create relationships between these collections. You'll visually link a post in the Posts collection to its author in the Users collection. Getting this structure right from the start is absolutely fundamental to making sure your app runs smoothly and doesn't become a tangled mess later.
This flowchart neatly summarizes the workflow, from refining the idea to choosing the platform where you'll actually implement your design and data structure.
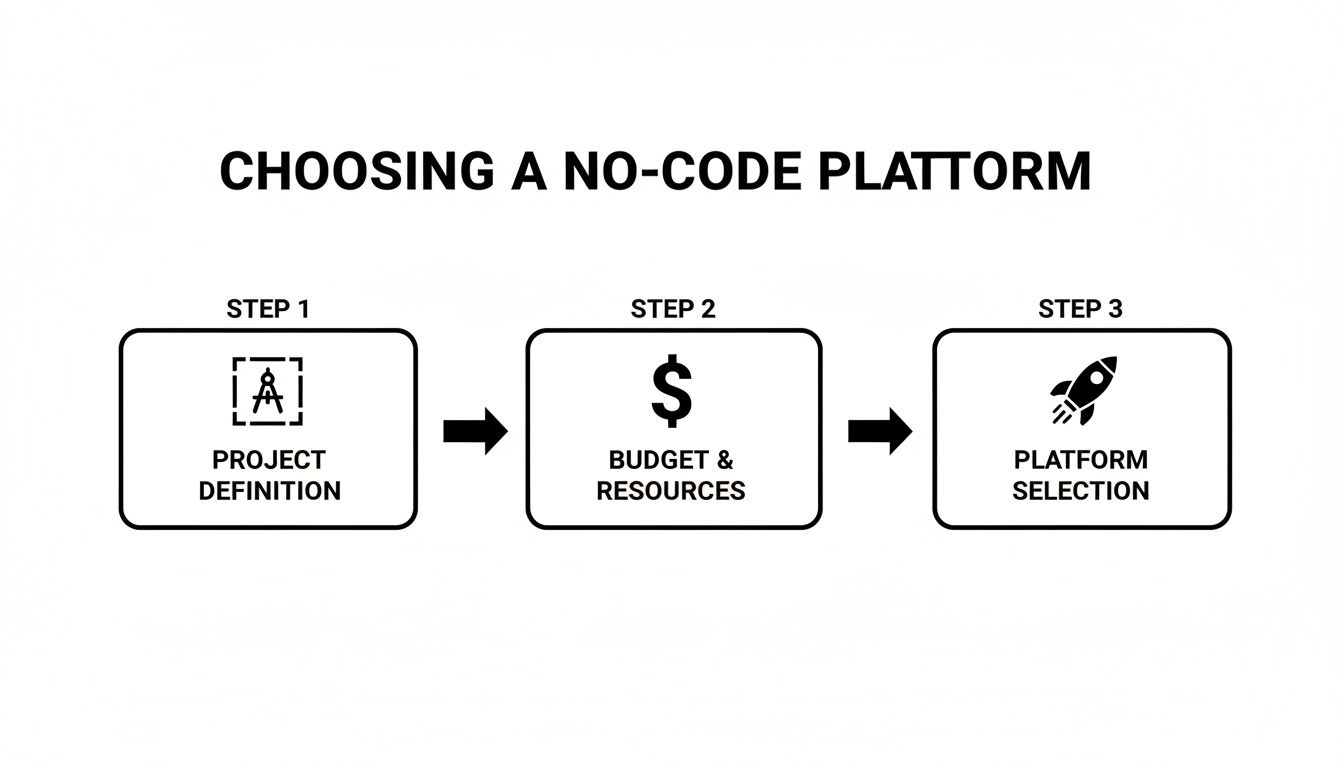 Flowchart outlining three steps to choose a no-code platform: project definition, budget, and selection.
As you can see, platform selection comes last for a reason. It builds on a solid foundation, preventing you from having to backtrack after making a costly mistake.
Wiring Up the Logic That Makes It All Work
Okay, so you have a pretty interface and an organized database. The final piece is the logic that connects them. In the no-code world, these are called "workflows" or "actions," and they dictate what happens when a user does something in your app. This is where you truly define the app's behavior, using visual editors instead of code.
Let’s take a simple "Sign Up" button as an example. You would build a workflow that looks something like this:
- When the button is clicked, grab the text from the email and password fields.
- Then, run an action called "Create a New User" and save that information to your Users collection.
- Next, execute another action to automatically log that new user into the app.
- Finally, navigate the user to the main dashboard screen.
Each of these steps is just a block you configure in a visual editor. You’re simply telling the platform, "When this happens, do that." You'll build out similar logic for everything—from publishing a new blog post to processing a payment through an integration like Stripe.
The beauty of no-code workflows is that they make complex backend processes understandable. You're not debugging code; you're tracing a visual flowchart to see where the logic breaks, making it far easier to build and troubleshoot.
This visual approach has completely changed the game. No-code tools are reducing app development time by up to 90% compared to traditional coding. This incredible leap in efficiency is why an estimated 70% of new business applications will be built using low-code or no-code technologies by 2025. You can dig into more stats on how citizen development is driving business innovation. For founders, this means you can build, test, and iterate on ideas at a speed that was once impossible without a team of engineers.
From Testing and Launch to Your First Users
Building your app is a huge milestone, but honestly, it’s only half the battle. The next phase—testing, launching, and getting that first wave of user feedback—is what turns a cool project into a real, living product.
It can feel a little daunting, especially when you’re staring down the app store submission process for the first time. But trust me, a good plan makes all the difference.
Before you even dream of hitting that “submit” button, you need to be your app’s biggest critic. Rigorous testing isn’t just for traditional coding; it's absolutely essential for a no-code build. You’re not just looking for bugs that crash the app. You’re hunting for confusing workflows, awkward layouts on different screen sizes, and anything that just feels clunky.
Seriously, don’t do this alone. Grab some friends, family, or colleagues who fit your target audience. Then, the hard part: sit on your hands and watch them use it without saying a word. Every time they get stuck or look confused, that’s a golden opportunity to make your app better.
Your Pre-Launch Testing Checklist
A little structure goes a long way here. You want to make sure you’re not missing glaring issues that will frustrate your first users right out of the gate.
- Core Functionality: Does every button, link, and form do what it’s supposed to do? Go through the main user journey from A to Z, over and over again.
- The First 5 Minutes: Can a brand-new user sign up, log in, and figure out the main point of your app without a manual? That first impression is everything.
- Data Integrity: When someone saves something, does it actually save? And does it show up correctly everywhere else it’s supposed to?
- Try to Break It: What happens when a user does something unexpected? Like uploading a massive photo or typing letters into a phone number field? Find these “edge cases” now, so your users don’t have to.
The point of pre-launch testing isn't to build a flawless app. It's about catching the 80% of problems that cause the most headaches. A functional app with a few rough edges is far better than a buggy one that no one can use.
Navigating the App Store Maze
Once your app is feeling solid, it’s time to get it out there. Submitting to the Apple App Store and Google Play Store has a bit of a reputation, but it’s gotten a lot easier. Many no-code platforms even have built-in tools to help package and submit your app, which is a huge timesaver.
The trick is to have all your materials ready before you start the submission process.
- App Icon & Screenshots: These are your storefront. Get high-quality visuals made that really show off what your app can do.
- Description & Keywords: Write a clear, simple description explaining who the app is for and what problem it solves. Think about the words people would search for to find you.
- Privacy Policy: This is a non-negotiable requirement. You’ll need a link to a privacy policy hosted somewhere online. There are plenty of free generators to help you create a basic one.
After you submit, your app goes into review, which can take a day or sometimes over a week. Getting a rejection is completely normal, so don’t panic. The reviewers are usually very specific about what needs fixing. Just address their notes, resubmit, and you’ll get there.
Once you’re live, the real fun begins. Watch those first reviews and feedback emails like a hawk. Your first users are your best source of truth for what to build next.
Knowing When to Evolve Beyond No-Code Tools
Launching your app with a no-code tool is a massive win. Seriously, pat yourself on the back. You've validated your idea, onboarded your first users, and proven that your concept has legs—all without writing a single line of code. It's the perfect launchpad.
But as your app gains traction and your user base grows, you might start to feel the platform's constraints.
This isn't a sign you did something wrong; it's the clearest signal of success you can get. The most successful apps eventually hit a ceiling where the very simplicity that made no-code so powerful in the beginning becomes a bottleneck. Performance might start to lag under heavy user loads, you might need a level of customization the platform just can't offer, or your backend logic becomes a tangled mess that's nearly impossible to manage.
Spotting these growing pains early is the key. It lets you plan your next move thoughtfully instead of scrambling when things start to break.
Signs You're Outgrowing Your No-Code Platform
So, how do you know when you've hit that ceiling? The signs are usually subtle at first, but they become glaringly obvious over time. If you find yourself nodding along to more than one of these points, it's a good sign you’re ready for the next stage.
- Performance Bottlenecks: Does your app feel sluggish? Especially with lots of people using it at once or as your database grows? If load times are creeping up and the user experience is starting to suffer, that's a major red flag.
- Deep Customization Needs: You've got a killer feature in mind, but it requires a totally bespoke UI or a niche integration that isn't in your platform’s plugin marketplace. You're stuck hacking together workarounds.
- Complex Backend Logic: Your once-simple workflows now look like a spider's web of conditional logic that's a nightmare to manage and debug. You simply need more direct control over your server-side processes.
- Scalability Concerns: You're starting to get nervous about how the platform will handle 10x or even 100x your current traffic. Or maybe you've looked at the pricing tiers and realized that scaling up will cost a fortune.
Hitting these limits doesn't mean you made the wrong choice. It means your no-code MVP did its job perfectly: it got you to the point where you have a problem worth solving with a more powerful solution.
The Next Step: A Code Starter Kit
When you outgrow your no-code platform, the traditional advice has always been to hire a dev team and rebuild everything from the ground up. This is an incredibly slow, expensive, and risky path. You basically have to throw away all your momentum and start over from square one.
But there's a much smarter way to bridge this gap. Instead of starting from zero, you can use a code starter kit.
A code starter kit is a production-ready codebase with all the essential, non-negotiable features already built and wired together. Think of it as a professional-grade foundation for your app. The core architecture—things like user authentication, navigation, database connections, and API layers—is already handled.
This creates a seamless transition from your no-code MVP. You’re not starting from a blank text editor; you’re starting on page 100 with a solid, scalable framework already in your hands. You can bring on a developer to build your unique features on top of this foundation, saving a huge amount of time and money while gaining total control and unlimited scalability. This is the logical evolution for when you need to grow beyond the limits of no-code.
Ready to scale your app beyond no-code without starting from scratch? AppLighter provides a premium, production-ready starter kit for Expo (React Native) with everything you need pre-configured. Build and ship your next-level mobile app faster with AppLighter.
Related Articles

How to Build an App Without Code from Idea to Launch
Discover how to build an app without code. This guide covers choosing a platform, designing the user experience, managing data, and launching your MVP.
No Code Application Development A Guide for Startup Founders
Explore no code application development to build your startup's app faster. Learn the benefits, limitations, and how to choose the right tools for your MVP.

How to Create a Website App with React Native and Expo
Learn how to create a website app using a modern, mobile-first approach with React Native and Expo. This guide covers setup, auth, AI, and deployment.